Thursday, November 15, 2012

Yammer or SharePoint 2013 or Neudesic Pulse for Social in 2013?


At the SharePoint2012 conference in Las Vegas, Microsoft showcased Social Computing in SharePoint 2013 and Yammer, and articulated vociferously their new-found commitment and enthusiasm for social as a central feature of intranets and pretty much everything else going forward.

This love-fest around social computing was dampened by the reality that Microsoft developed a set of Social features in SharePoint 2012 and then subsequently acquired Yammer. While the acquisition of Yammer underscores Microsoft's commitment to social, it muddied the waters leaving us with a distinctly cloudy and complicated message.
 
In a nutshell, that complex message seems to be that Yammer is the premiere social computing product that customers should use if at all possible, the Microsoft-developed social features in SharePoint 2013 are an alternative that may also be useful in certain circumstances, but pick one or the other: don't use both.

My clients are asking me which way to go, and I am working hard to synthesize a decision tree. Most of my clients embrace enterprise social computing and some need the kind of deep integration of Social features into applications that Yammer's Adam Pisoni was talking about at the SharePoint Conference 2012. (By deep integration I mean solutions for scenarios like deriving insight into customer needs or product development.) I don't have that decision tree worked out yet, but it is clear that they must choose one of three directions: 1) yammer if at all possible, the key  problem being if clients require hosting all data on-premesis, because the data in Yammer exists in the cloud. 2) social in SP or 3) a third-party product like Newsgator or Neudesic Pulse, which work fine in 2010.

Friday, September 21, 2012

Why Social Computing Really Comes to Life in SharePoint - 1


This series of posts explores the synergetic relationship between social computing and collaborative computing, with an in-depth look at several high-impact applications that leverage social computing features in SharePoint 2013.

I developed these applications and the attached PowerPoint presentation for SharePoint Saturday Redmond 2012.

So why does social computing really come to life in SharePoint? In a word, because it keeps the communication in context:

 
  • Successful social computing applications in SharePoint capture the communication between users in the context of the work they are doing.
  • It helps users keep track of people, keep track of work and keep track of the connections between them.
  • Social computing, done right, elevates teamwork to a whole new level.
  • It helps users find and get help from the experts, improving the traction and efficiency of the organization. And it can improve the overall quality of the work product
Why I Care

I have been developing collaborative applications since the early 1990s, starting with Lotus Notes, later with Groove, and now with SharePoint. I have followed the rise of social computing with great interest and healthy skepticism. What I see now is ample evidence that Social Computing can greatly increase the impact of many collaborative applications. The caveat is, l
ike everything in SharePoint, you have to do it right. 

Now, you may ask, “How can you say there is ample evidence that Social Computing is so great in SharePoint, when SharePoint 2013 hasn’t even been released yet?"

The answer is that social is nothing new to SharePoint. We’ve been building social applications in SharePoint since at least 2008. Companies like Neudesic and NewsGator have shipped Social products and deployed Social Apps in SharePoint with great success for years.

At Neudesic, we have been building compelling Social Computing apps integrated into SharePoint using our Pulse product. So I was extremely interested -- to put it mildly -- when, in July 2012, Ben Wilde demonstrated the SharePoint 15 Social Investments.
What immediately struck me, watching Ben's demo, was that the Social features in SharePoint 2013 look an awful lot like the Neudeisc Pulse in SharePoint 2010.
My reaction? Now that we have SharePoint 2013 in Beta, it validates what Neudesic has been doing all along. The social computing features in SharePoint 2013 bear such an uncanny resemblance to those in Neudesic Pulse that we must be seeing some kind of convergence. 

Pulse is the Social Computing product from Neudesic. Like corporate facebook, Pulse is a stand-alone product, but it integrates well with SharePoint 2010.

Analyzing Pulse in SharePoint 2010 side-by-side with Social in SharePoint 2013, I have come to the conclusion that the similarities far outweigh the differences. The biggest differences, in my analysis, are:
  1. Pulse has been shipping for 3 releases now
  2. Pulse works great in SharePoint 2010
  3. Pulse does not require My Sites, and
  4. You can use Pulse stand-alone (without SharePoint) if you like.
Pulse also has awesome iPhone, Android and Windows Phone apps:
 
So I set out to write these blog posts; not so much to compare and contrast Pulse with SharePoint, but rather to analyze what makes social computing work best in the context of SharePoint applications. With my deep experience building collaborative software, my inside knowledge of Pulse, and my professional expertise in SharePoint, I feel uniquely qualified to convey my answers to the following key questions:
  1. What are the key features behind successful social computing in SharePoint?
  2. What are the high-impact applications where social really works? And
  3. How can I build these high-impact applications – either in SharePoint 2010 or in SharePoint 2013?

Let's start by looking at the technical elements that make the integration of social into SharePoint successful. Later I will demonstrate how, using these elements, to build compelling SharePoint applications that leverage social computing.

The Nuts and Bolts of Social Computing


These are the building blocks -- the core, Facebook-inspired features -- that are the nuts and bolts of social computing.

Micro-blogging
Micro-blogging is at the heart. You can read, post, and reply. The result is a threaded discussion; When merged with other threads we sometimes call this an activity stream.

Follow

What does it mean to Follow? To Follow an activity stream adds that stream to your newsfeed

In SharePoint 2013, you can follow:

  • People
  • Documents
  • Sites
  • Tags 
In Pulse in SP 2010 you can follow:
  • People
  • Posts
  • Groups
  • Tags
  • Systems
In Pulse, follow also creates a bookmark (“People followed by me”)

Liking and Mentioning

Both Liking and Mentioning create connections. You get a notification in your E-mail each time someone mentions you in a post.

Tagging and Rating

Tagging and Rating (or voting) are both a bit like democratic bookmarking. You use tags and votes to find stuff later.

 E-mail

Speaking of Mentioning: don’t forget E-mail! The E-mail in-box remains so deeply entrenched you cannot succeed without robust email integration. Notifications go to your inbox each time someone mentions you in a post. The E-mail contains a link back to the Activity Stream. This drives people back into the social tool which is good. As much as we all wish E-mail would become obsolete, it is not. It’s entrenched. It’s the boat anchor. Your social solution must integrate with E-mail or forget it.

So what kinds of collaborative applications really shine when enriched with social features?  And how do I create great social + collaborative applications now that we have such a rich tool chest to work with?
Four High Impact Social Computing Apps in SharePoint

Here's my short list of high-impact social computing applications in SharePoint:


Team collaboration around developing a document or presentation

A typical scenario for this application is when a sales or account team needs to collaborate around developing a response to an RFP. 

A well-designed team collaboration application focuses the social discussion on the document, doc set, or other work product that the team is developing. Your key design point for this kind of application is to present the work-product content as close to the discussion as possible.

Knowledge base -- or forum -- where community members vote on, or rate, documents, answers or posts

Knowledge management experts know the value of end-user feedback to refine, or filter a corpus of knowledge.  

The design point of a knowledge base, or forum, is to harness the knowledge of your people, leveraging that wisdom to cultivate and continuously refine the repository of content. The feedback must be leveraged to sort views and rank search results so that others can find the best, most useful stuff right away.


KPI dashboard where metrics are enhance by discussion; group leaders and members discuss and act on results


SharePoint has long been a great platform for Business Intelligence (BI) dashboards. Now social features only make that better.

Your key design goal for applications like this is to give dashboard users immediate access to the people who are responsible for the business or the process that the metrics are measuring.  Managers need to be able to ping a team member and ask why a certain KPI has turned red. If you are the one responsible for a certain outcome, you want to be able to post a comment that lets everyone (like your boss) know that you are aware of the metric, and you know what your team is doing about it.

Expertise Finder: Identifying and getting help from co-workers who have specific knowledge

I rarely see a specific application created for finding experts. Rather, finding expertiese is implemented by making sure Search includes detailed, up-to-date user profiles. 

Enterprises realize significant value from the ability to find co-workers who have specific knowledge.  While this may well be the most important app on my short list, it often comes for free as a by-product of a truly collaborative corporate culture.

The key elements of expertise finder are:
  • broad user adoption and participation in social technologies
  • detailed user profiles
  • effective search
In subsequent posts, we'll examine actual implementations of some of these applications, mostly using SharePoint 2013. We'll give screen shots and instructions for how to build these apps using out-of-the box features available in SharePoint 2013. 
 

Monday, August 6, 2012

My speaker session has just been accepted for SharePoint Saturday Redmond 2012. I'll be speaking on "Why Social Computing Really Comes to Life in SharePoint". The event occurs on Saturday September 22, 2011. I plan to blog most of my material here first. Here is the abstract for my session:

Social computing adds a whole new dimension to collaboration platforms like SharePoint. Tagging, Following and Microblogging, when integrated successfully into SharePoint, can really bring your web applications to life. The right integration of social computing increases the impact of your business application by plugging them in to the power of teamwork.

The new social computing features Microsoft has introduced in SharePoint 2013 closely mirror and validate the approach of earlier third party social computing applications such as Neudesic Pulse.  This presentation will reveal what approach both Microsoft and Neudesic took to integrating social with SharePoint, and what makes that approach so successful.  We will look, in-depth, at high-impact applications that leverage social computing features integrated into SharePoint.


This session is not a Pulse sales pitch, nor will it simply compare-and-contrast SharePoint 2013 with Pulse. Rather, we will pinpoint the common features of both Pulse and  SP2013 that make social computing in SharePoint a synergetic relationship. We will look at the web parts, service apps and other technical elements that make this integration so successful and demonstrate how, from a solution developer's perspective, to design compelling applications that leverage those elements.


I hope to see you there!

Tuesday, June 12, 2012

I will be delivering my demo and presentation on The Art and Science of the XSLT List View Web Part at Seattle Code Camp 2012 this Saturday, June 16, 2012 in Redmond.

Friday, May 18, 2012

XSLT List View Web Part Best Practices, part 3

This is the third post that follows the presentation I gave to the Puget Sound SharePoint Users Group on May 17, 2012.

Parts 1 and 2 of the XSLT List View Web Part Best Practices described a procedure that sets you up with a Visual Studio Solution and a known-good XSLT file derived from SharePoint.

The benefits of this setup are two-fold:
  • You can edit your XSLT in Visual Studio 2010. For any large XSLT file, Visual Studio is the right place to edit your XSLT, particularly when the rest of your project is in Visual Studio.  Visual Studio gives you intellisense, syntax color-coding, and more importantly, a robust environment that respects your source code as sacred. SPD sometimes does funny things to your files.
  • You can iteratively deploy and test your XSLT in-situ meaning,  in place in SharePoint where it's really going to run in production. There are scores of great XSLT development tools on the market but none of them seem to understand the SharePoint-specific quirks of XSLT developed to run inside an XSLT List View Web Part.

This post describes a PowerShell script that automates the key step of uploading the XSLT file you are editing in Visual Studio to the Style Library of your test site in one click. This script streamlines the process so you can edit-upload-test in a tight iterative cycle in order to really do your XSLT development inside SharePoint.

Recall from part 2 that we configured the XSLT List View Web Part to use the "SpotNewsStyle.XSLT" file located in the Style Library.  We did this by editing the web part properties and setting the XSL Link field to point to our custom XSLT file in the Style Library. This means we can iteratively tweak our XSLT file, upload the XSLT file to the Style Library, and test by just refreshing the browser.  This faster, less invasive and safer than editing the web part every time. The PowerShell script below reduces the already quick process of uploading the XSLT file to the Style Library to one click.

The LoadStyle.ps1 script


The LoadStyle.ps1 script below (part of the sample "Spot" solution available here) is designed to reside in and be run inside the "Deploy" folder of the "Spot" Visual Studio solution. You will certainly need to edit this file to make it work in your environment. However, the changes you need to make should be obvious and straightforward. This script has the name and relative path to the custom XSLT file (SpotNewsStyle.xslt) and Css style file (SpotStyles.css) hard-coded. It copies those two files from where they reside to the current working directory.  It then opens my test SharePoint server at the hard-coded URL http://vm01  and uploads both files to the Style Library.

Add-PSSnapin Microsoft.SharePoint.PowerShell -ErrorAction
    "SilentlyContinue"
Start-SPAssignment -Global

Copy-Item ..\StylesAndScriptsModule\SpotNewsStyle.xslt . -Force
Copy-Item ..\StylesAndScriptsModule\SpotStyles.css . -Force
$spWeb = Get-SPWeb -Identity
http://vm01/sites/spot/
$spFolder = $spWeb.GetFolder("Style Library")
$spFileCollection = $spFolder.Files
$xsltFile = Get-ChildItem -LiteralPath $(Get-Childitem SpotNewsStyle.xslt)
$xsltFileStream = $xsltFile.OpenRead()
$spFileCollection.Add(

    "Style Library/XSL Style Sheets/SpotNewsStyle.xslt",
    $xsltFileStream, $true)
$xsltFileStream.Close()
$xsltFile.Delete()
$cssFile = Get-ChildItem -LiteralPath $(Get-Childitem SpotStyles.css)
$cssFileStream = $cssFile.OpenRead()
$spFileCollection.Add("Style Library/SpotStyles.css", $cssFileStream, $true)
$cssFileStream.Close()
$cssFile.Delete()
Stop-SPAssignment -Global

After uploading to the Style Library, it deletes copies of the files that it created in the current working directory.  It does this so you can run this script over and over and it will always get the latest new version from the Visual Studio directory.

The Development Process

With all these pieces in place, you may iteratively develop your XSLT file by:
  1. In Visual Studio, edit your custome XSLT file and click "save"
  2. Switch tasks to your SharePoint Management Shell (PowerShell) and run the LoadStyle.ps1 script shown above.
  3. Switch task to your browser which should already have your SharePoint site open with the page that has the XSLT list view web part displayed.
  4. Press F5 to refresh the browser.
The Web part re-reads the newly uploaded XSLT list view and renders to your browser. This process seems less integrated than the Visual Studio F5 debug button but it's actuall much faster (Your browser can already be running - - no need to launch IE) eliminates a whole set of issues associated with Visual Studio trying to "compile" your XSLT.

Conclusion


When you are developing XSLT for the SharePoint XSLT List View Web Part, you really only need to save your file, upload it to the Style Library, and refresh your browser in order to test it.  These blog posts described how to streamline your development process to the bare essentials freeing you to repeatedly code-and-test iteratively in the most efficient manner possible.  I hope it helps. <MC>

XSLT List View Web Part Best Practices, part 2

The Art and Science of the SharePoint XSLT List View Web Part (part 2)

This is the second post that follows the presentation I gave to the Puget Sound SharePoint Users Group on May 17, 2012.

This (part 2) blog goes in detail through the best practices I mentioned in the "procedure" summary in yesterday's post.  For reference these best practices are listed below and described more step-by-step in the rest of this post:

Best Practices (Summary)

  1. Lay the Groundwork
  2. Obtain the Known-Good SharePoint XSLT file. This becomes your Custom XSLT File.
  3. Create a "Deploy" Project Folder in Visual Studio but outside your SharePoint Solution
  4. Upload your Custom XSLT File to your Style Library and set the XSLT Link Property of your XSLT List View Web Part to point to it.
  5. Create a LoadXSLT.ps1 script that loads your custom XSLT file to your Style libraray with one click

1. Lay the Groundwork

Before we get to the XSLT, we need to lay the groundwork. The goundwork consists of:
  1. Create a SharePoint site where you will do your development work, e.g. /sites/spot
  2. Create the Visual Studio Solution
  3. Add Site Columns
  4. Add a Content Type
  5. Add List Definition from Content Type
  6. Modify the List Schema to make the default view contain all the important columns
The above steps are pretty much cut-and-dired SharePoint development so I won't go into detail. The finished "News and Announcements" list is available as the "Spot" sample solution at the drop box location above. The list provides the data but not the visual presentation we need.

2. Obtain a Known-Good SharePoint XSLT file using SharePoint Designer 2010

Obtain a Known-Good SharePoint XSLT file using SharePoint Designer to “harvest” the XSLT of your List View. This is an extremely valueable trick:

Use SharePoint Designer 2010 to Add the XSLT List View Web Part to the site home page.


  1. Open the Site in SharePoint Designer
  2. Under Customization, click Edit site home page asd;lfk
  3. SharePoint designer displays the Home.aspx page in Design mode. Click in the center or wherever you want to put the News and Announcements web part.
  4. Select the "Insert" tab on the SharePoint Designer Ribbon.
  5. Select the "Data View" button on the "Insert" ribbon. This will display the lists and Document Libraries available:
  1. Select the News and Announcements  list we previously created.SharePoint designer adds the WebPartPages:XsltListViewWebPart  to the page
  2. Choose split view to see the markup <WebPartPages:XsltListViewWebPart>


Now "Harvest" the XSL created by SharePoint from this new web part

Still in SharePoint Designer 2010, click the "Design" tab in the ribbon
In the "Actions" section of the ribbon (towards the right) click "Customize XSLT"
SharePoint Designer displays the markup for the web part including the <xsl> element that defines the full XSLT markup used by the web part.


  1. The "Customize XSLT" ribbon button displays a couple of choices. Select "Customize Entire View".    SharePoint Designer expands the entire XSLT into the Code pane.
  2. Select code in SharePoint Designer to view the complete markup of the web part.
  3. You want to copy the XSLT part of the and save it on disk so that you can add just that file to the "Spot" solution.
  4. Find the <xsl> element that marks the start of the stylesheet. This will be some 10 lines down. The start will look like this:
  5. <xsl>
      <xsl:stylesheet xmlns:x=http://www.w3.org/2001/XMLSchema
  6. Copy everything between the <xsl> starting tag and the </xsl> closing tag, not inclusive.  There will be a lot. Copy to your clipboard.

3. Create a "Deploy" Project Folder in Visual Studio

Paste the XSLT you have in your clipboard into a new file in your Visual Studio Solution as follows:

    1. Open your Visual Studio solution
    2. Add a new Project Folder called "Deploy" that is OUTSIDE the SharePoint project
    3. In the "Deploy" folder, create a new file of type "XSLT" called, e.g. SpotNewsStyle.xslt
    4. Paste the XSLT from your clipboard into this XSLT file.
Your SpotNewsStyle.xslt file should start with <xsl:stylesheet> and end with </xsl:stylesheet>

4. Upload your Custom XSLT File to your Style Library and set the XSLT Link Property of your XSLT List View Web Part to point to it.
      Manually upload your XSLT file to the Style Library in your site
      While developing your XSLT, you may short-cut the SharePoint <deploy> or F5 step and simply edit the XSLT file in Visual Studio, then upload the file to the Style Library of the site and refresh the browser:
      1. Open your Site in IE
      2. Site Actions --> View All Site Content
      3. Select Style Library from the list of Document Libraries
      4. To conform with convention, create a new folder named "XSL Style Sheets" in the Style Library if your library does not already have one. Do this in the Style Library by clicking "Documents" in the ribbon.  Click "New Folder" in the Ribbon. Name the new folder "XSL Style Sheets".
      5. Open the XSL Style Sheets Folder.
      6. Click Add Document.
      7. In the "Upload Document" dialog, click Browse… and navigate to the project folder (\StylesAndScriptsModule) where you saved your SpotNewsStyle.xslt file.
      8. Select your SpotNewsStyle.xslt file and click Open.
      9. After your XSLT file is uploaded to your Styles Library, right-mouse-click on the new file and copy shortcut so you have the full and correct path on your clipboard for the next step.

      Set the XSL Link Property of the XSLT List View Web Part to point to your custom XSLT
      1. Open the home page of your Site in IE
      2. Edit the page
      3. From the Web Part Properties menu select Edit Web Part
      4. SharePoint displays the properties of the XSLT List View Web Part on the right
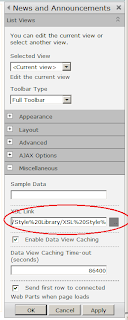
      5. In the Properties pane, scroll down and expand the "Miscellaneous" section
      6. In the field marked XSL Link , PASTE or enter the path to the SpotNewsStyle.xslt file you stored in the Style Library:


  1. Click OK

  1. Save your edits to the page.
The benefit of this arrangement is that you will not have to re-edit this home page while editing the XSLT file. All  you have to do is upload your edited XSLT file to the Style Library then refresh the home page and it will render the XSLT if it can.

The next post will describe a PowerShell script that automates this step of uploading the XSLT file to the Style Library in one click.  This streamlines the process so you can edit-upload-test in a tight iterative cycle in order to really do your XSLT development inside SharePoint.


Thursday, May 17, 2012

XSLT List View Web Part Best Practices, part 1

The Art and Science of the SharePoint XSLT List View Web Part

This post follows the presentation I gave to the Puget Sound SharePoint Users Group on May 17, 2012.
Click here to get the Visual Studio Solution "Spot" that I demonstrated as well as the Power Point deck I used in that presentation.


This post walks you through the steps to get a working XSLT file that customizes the way your SharePoint list is rendered using the SharePoint 2010 XSLT List View Web Part (XLV). This procedure works with any SharePoint list, stock or custom. You can use the resulting XSLT file as the starting point to create any customized display of your SharePoint list. Most importantly, this series of posts provides guidance and best practices on how to manage your XSLT file as part of a Visual Studio 2010 SharePoint solution.

Scenario:

  • Your UI designer creates a nice visual design.
  • Your client loves it
  • A central element of the UI should be a SharePoint list, but it doesn't look anything like a SharePoint list
  • Your UI designer gives you static HTML and CSS

What do you do?

  1. Use Visual Studio to develop your SharePoint List
  2. Obtain a Known-Good SharePoint XSLT file using SharePoint Designer to “harvest” the XSLT of your List View
  3. Create a “Deploy” Project Folder outside your Visual Studio Solution. include:
    • Your XSLT file
    • Your CSS file
    • You JS file, if any
  4. Set the XSL Link Property of your XSLT List View Web Part to point to your custom XSLT file in your Style Library
  5. Create a “LoadXSLT.ps1” script that load your XSLT and CSS from your Project Folder into the Style Library of your site
I know, I know: Yikes!! 
No worry. Attached Visual Studio Solution -- Spot -- contains the resulting project from these steps.
Subsequent posts explain the above steps in step-by-step detail.
The next blog post will walk you through how to create these elements of a known best-practices appraoch to developing this "News and Announcements" feature of your site maximizing the Out-Of-The-Box capabilities of SharePoint 2010.

Monday, May 14, 2012

Presentation on XSLT List View Web Part at PSSPUG May 17, 2012

I will be presenting at the next meeting of the Puget Sound SharePoint Users Group next Thursday, May 17th. The meeting goes from 6:30 - 8:30PM. Food and networking begin at 6:00PM. Michael Iem will be presenting at 6:35 on Measuring and Understanding SharePoint Performance and I will be presenting at 7:30 on the XSLT List View Web Part. The user group meeting is held at the Microsoft office (CIVICA Office Commons) at 205 - 108th Ave NE, Suite 400, Bellevue, WA 98004 . See http://www.psspug.org.

Thursday, March 22, 2012

C# Code to look up current user in Active Directory

C# Code to look up Current User in Active Directory

Here's some re-usable C# code to lookup the currently logged-in user in Active Directory to get various AD properties such as FirstName, Last Name, and Email. The method IsExistInAD() below is handy in intranet applications where your ASCX or ASPX can assume the current user is authenticated in the domain and you need properties of the user from Active Directory. Method IsExistInAD() takes, as input the user name in the format DOMAIN\\alias and performs a Directory search using .NET Directory Services using System.DirectoryServices.ActiveDirectory. If successful, it populates the private SearchResult _result variable with the various properties from Active Directory and returns true. If the Directory search does not find the current user, the IsExistInAD() method returns false.  Note this code handles multiple domains, so if some of your users have username e.g. NORTHAMERICA\\bobsmith and other users have e.g. SOUTHAMERICA\\juanparamo, this code handles it by parsing the domain name and using it in the rootDirectory of the Directory Searcher, so it will find the user in the correct ActiveDirectory Domain.

Note that your ASP.NET application gets this user name to pass as input to IsExistInAD() automatically for the currently logged in user from the Page.User.Identity.Name property when your web application is configured for Windows Authentication.

The first time you setup the target server that will run the Site Info Web Application, you must configure IIS to use Windows Authentication. The Site Info Web Application depends on this and it is not the default configuration of IIS.  This configuration setting is Windows/IIS and does not require adjustment on future deployments of new builds or upgrades.

How to Configure Windows Authentication 


On the target IIS server
From Server Manager, Open Internet Information Services (IIS) Manager

In the left side panel, select the server (e.g. ZLMRCWEB31)

Double-click the  Authentication icon to open the Authentication Applet

  1. Enable Windows Authentication

  1. Disable Anonymous Authentication


Code Default.aspx.cs

using System;
using System.Collections.Generic;
using System.Collections;
using System.Linq;
using System.Web;
using System.Web.UI;
using System.Web.UI.WebControls;
using System.DirectoryServices;
using System.DirectoryServices.ActiveDirectory;
namespace TestADLookupUsersEmail
{
    public partial class _Default : System.Web.UI.Page
    {
        public class ContactADFields
        {
            public string FirstName;
            public readonly string FirstNameProp = "givenname";
            public string LastName;
            public readonly string LastNameProp = "sn";
            public string Email;
            public readonly string EmailProp = "mail";
            public string FullName;
            public readonly string FullNameProp = "displayname";
        }
        private SearchResult _result;
        private ContactADFields contact = new ContactADFields();       

        protected void Page_Load(object sender, EventArgs e)
        {
        }
        public string getUserIdentityName()
        {
            return Page.User.Identity.Name;
        }
        public string getUserEmail()
        {
            if (IsExistInAD(Page.User.Identity.Name))
            {
                if (_result.Properties.Contains(contact.FirstNameProp))
                {
                    contact.FirstName = (string)_result.Properties[contact.FirstNameProp][0];
                }
                if (_result.Properties.Contains(contact.LastNameProp))
                {
                    contact.LastName = (string)_result.Properties[contact.LastNameProp][0];
                }
                if (_result.Properties.Contains(contact.EmailProp))
                {
                    contact.Email = (string)_result.Properties[contact.EmailProp][0];
                }
                if (_result.Properties.Contains(contact.FullNameProp))
                {
                    contact.FullName = (string)_result.Properties[contact.FullNameProp][0];
                }
                int propCount = _result.Properties.PropertyNames.Count;
                foreach (string propName in _result.Properties.PropertyNames)
                {
                    try
                    {
                        string propVal = (string)_result.Properties[propName][0] as String;
                    }
                    catch (Exception)
                    {
                        continue;
                    }
                }
            }
            return contact.Email;
        }
        /// <summary>
        /// Parse a User Identity Name e.g. "REDMOND\\billg" setting the out accountName and out domainName
        /// </summary>
        /// <param name="path"></param>
        /// <param name="accountName"></param>
        /// <param name="domainName"></param>
        /// <returns>true if successful parsing the input user name</returns>
        private bool ParseUserName(string path, out string accountName, out string domainName)
        {
            bool retVal = false;
            accountName = String.Empty;
            domainName = String.Empty;
            string[] userPath = path.Split(new char[] { '\\' });
            if (userPath.Length > 0)
            {
                retVal = true;
                accountName = userPath[userPath.Length - 1];
                if (userPath.Length > 1)
                {
                    domainName = userPath[userPath.Length - 2];
                }
            }
            return retVal;
        }
        /// <summary>
        /// Lookup user in AD, and if successful, set SearchResult _result and return true.
        /// </summary>
        /// <param name="loginName">The Page.User.Identity.Name e.g. "REDMOND\\billg"</param>
        /// <returns>True if found in AD. Also sets SearchResult _result.</returns>
        private bool IsExistInAD(string loginName)
        {
            DirectorySearcher search = null;
            string userName;
            string domainName;
            if (ParseUserName(loginName, out userName, out domainName))
            {
                DirectoryContext dirCtx = new DirectoryContext(DirectoryContextType.Domain, domainName);
                if (dirCtx != null)
                {
                    Domain usersDomain = System.DirectoryServices.ActiveDirectory.Domain.GetDomain(dirCtx);
                    if (usersDomain != null)
                    {
                        DirectoryEntry rootDirEntry = usersDomain.GetDirectoryEntry();
                        if (rootDirEntry != null)
                        {
                            search = new DirectorySearcher(rootDirEntry);
                            search.Filter = String.Format("(SAMAccountName={0})", userName);
                        }
                    }
                }
            }
            else
            {
                search = new DirectorySearcher();
                search.Filter = String.Format("(SAMAccountName={0})", loginName);
            }
            // Adding properties to the DirectorySearcher is supposed to make the
            // query more efficient by only returning the fields we want. However,
            // doing so seems to always make teh Last Name prop ("sn") return blank.
            //search.PropertiesToLoad.Add(contact.FirstNameProp);
            //search.PropertiesToLoad.Add(contact.LastNameProp);
            //search.PropertiesToLoad.Add(contact.EmailProp);
            //search.PropertiesToLoad.Add(contact.FullNameProp);
            _result = search.FindOne();
           
            if (_result == null)
            {
                return false;
            }
            else
            {
                return true;
            }
        }
    }
}


Tuesday, January 31, 2012

I led a team last spring to develop a Software Development Kit for Windows Phone. Today I just got word that Microsoft has published it:  a beta of its Amazon Web Services (AWS) software development kit (SDK) for Windows Phone. This was a fun challenge taking Amazon Web Services (which are awesome) and making a Sliverlight + Windows Phone 7 library and set of sample programs available to consume those services.