The Art and Science of the SharePoint XSLT List View Web Part (part 2)
This is the second post that follows the presentation I gave to the Puget Sound SharePoint Users Group on May 17, 2012.
This (part 2) blog goes in detail through the best practices I mentioned in the "procedure" summary in yesterday's post. For reference these best practices are listed below and described more step-by-step in the rest of this post:
Best Practices (Summary)
- Lay the Groundwork
- Obtain the Known-Good SharePoint XSLT file. This becomes your Custom XSLT File.
- Create a "Deploy" Project Folder in Visual Studio but outside your SharePoint Solution
- Upload your Custom XSLT File to your Style Library and set the XSLT Link Property of your XSLT List View Web Part to point to it.
- Create a LoadXSLT.ps1 script that loads your custom XSLT file to your Style libraray with one click
1. Lay the Groundwork
Before we get to the XSLT, we need to lay the groundwork. The goundwork consists of:
- Create a SharePoint site where you will do your development work, e.g. /sites/spot
- Create the Visual Studio Solution
- Add Site Columns
- Add a Content Type
- Add List Definition from Content Type
- Modify the List Schema to make the default view contain all the important columns
2. Obtain a Known-Good SharePoint XSLT file using SharePoint Designer 2010
Obtain a Known-Good
SharePoint XSLT file using SharePoint Designer to “harvest” the XSLT of your
List View. This is an extremely valueable trick:
Use SharePoint Designer 2010 to Add the XSLT List View Web Part to the site home page.
- Open the Site in SharePoint Designer
- Under Customization, click Edit site home page asd;lfk
- SharePoint designer displays the Home.aspx page in Design mode. Click in the center or wherever you want to put the News and Announcements web part.
- Select the "Insert" tab on the SharePoint Designer Ribbon.
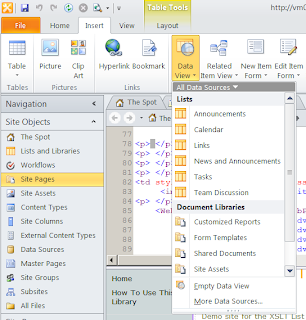
- Select the "Data View" button on the "Insert" ribbon. This will display the lists and Document Libraries available:
- Select the News and Announcements list we previously created.SharePoint designer adds the WebPartPages:XsltListViewWebPart to the page
- Choose split view to see the markup <WebPartPages:XsltListViewWebPart>
Now "Harvest" the XSL created by SharePoint from this new web part
Still in SharePoint Designer 2010, click the "Design" tab in the ribbonIn the "Actions" section of the ribbon (towards the right) click "Customize XSLT"
SharePoint Designer displays the markup for the web part including the <xsl> element that defines the full XSLT markup used by the web part.
- The "Customize XSLT" ribbon button displays a couple of choices. Select "Customize Entire View". SharePoint Designer expands the entire XSLT into the Code pane.
- Select code in SharePoint Designer to view the complete markup of the web part.
- You want to copy the XSLT part of the and save it on disk so that you can add just that file to the "Spot" solution.
- Find the <xsl> element that marks the start of the stylesheet. This will be some 10 lines down. The start will look like this: <xsl>
- Copy everything between the <xsl> starting tag and the </xsl> closing tag, not inclusive. There will be a lot. Copy to your clipboard.
<xsl:stylesheet xmlns:x=http://www.w3.org/2001/XMLSchema
3. Create a "Deploy" Project Folder in Visual Studio
Paste the XSLT you have in your clipboard into a new file in your Visual Studio Solution as follows:- Open your Visual Studio solution
- Add a new Project Folder called "Deploy" that is OUTSIDE the SharePoint project
- In the "Deploy" folder, create a new file of type "XSLT" called, e.g. SpotNewsStyle.xslt
- Paste the XSLT from your clipboard into this XSLT file.
4. Upload your Custom XSLT File to your Style Library and set the XSLT Link Property of your XSLT List View Web Part to point to it.
- Open your Site in IE
- Site Actions --> View All Site Content
- Select Style Library from the list of Document Libraries
- To conform with convention, create a new folder named "XSL Style Sheets" in the Style Library if your library does not already have one. Do this in the Style Library by clicking "Documents" in the ribbon. Click "New Folder" in the Ribbon. Name the new folder "XSL Style Sheets".
- Open the XSL Style Sheets Folder.
- Click Add Document.
- In the "Upload Document" dialog, click Browse… and navigate to the project folder (\StylesAndScriptsModule) where you saved your SpotNewsStyle.xslt file.
- Select your SpotNewsStyle.xslt file and click Open.
- After your XSLT file is uploaded to your Styles Library, right-mouse-click on the new file and copy shortcut so you have the full and correct path on your clipboard for the next step.
- Open the home page of your Site in IE
- Edit the page
- From the Web Part Properties menu select Edit Web Part
- SharePoint displays the properties of the XSLT List View Web Part on the right
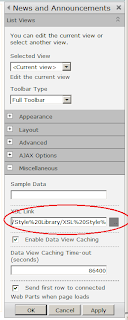
- In the Properties pane, scroll down and expand the "Miscellaneous" section
- In the field marked XSL Link , PASTE or enter the path to the SpotNewsStyle.xslt file you stored in the Style Library:
Manually upload your XSLT file to the Style Library in
your site
While developing
your XSLT, you may short-cut the SharePoint <deploy> or F5 step and
simply edit the XSLT file in Visual Studio, then upload the file to the Style
Library of the site and refresh the browser:
Set the XSL Link Property of the XSLT List View Web
Part to point to your custom XSLT
- Click OK
- Save your edits to the page.
The benefit of this arrangement is that you will not have to
re-edit this home page while editing the XSLT file. All you have to do is upload your edited XSLT
file to the Style Library then refresh the home page and it will render the
XSLT if it can.
The next post will describe a PowerShell script that automates this step of uploading the XSLT file to the Style Library in one click. This streamlines the process so you can edit-upload-test in a tight iterative cycle in order to really do your XSLT development inside SharePoint.


This was great! Thank you for sharing!
ReplyDelete