Saturday, July 25, 2015

SharePoint 2013 BI Farm Setup Guide: Section XIII: Configure Office Web Apps

This is section XIII of the MBP SharePoint 2013 BI Farm Setup Guide. 

This section describes how to configure an Office Web Apps 2013 Server so that Office documents in SharePoint can be displayed within the browser.


As mentioned in Section I, MBP stands for "Martin's Best Practices."  I use MBP as the acronym for the enterprise, the domain and also the name of the farm. MBP does not correspond to any actual company or client. You may use this guide as a template by globally replacing "MBP" with the acronym or name of your company or client.


About this Section

This section contains steps to install Office Web Apps on the separate Web Apps server (MBP-OWA). Note that Office Web Apps must be installed on a server that does not have SharePoint, Office or SQL Server installed.

Note: if your OWA server is running Windows Server 2008 R2, you must install the .Net framework 4.5 (.NET Framework 4.5) before proceeding. See http://www.microsoft.com/en-us/download/confirmation.aspx?id=30653 For our MBP farm, the MBP-OWA server is running Windows Server 2012 R2 which already has .NET 4.5.

These sections follow the TechNet article http://technet.microsoft.com/en-us/library/jj219455(v=office.15).aspx


A. Prepare the OWA Server

1. Connect to the Office Web Apps Server (MBP-OWA) and login as the Setup User Account (MBP\sp_admin).

2. Shift – Right-click on the Windows PowerShell icon in the task bar to open Windows PowerShell as Administrator


3. At the UAC prompt, click Yes.

4. Assuming your OWA server is running Windows Server 2012 R2, run the following PowerShell Command to install the required roles and services. If your server is Windows Server 2008 R2, check the TechNet article for the specific PowerShell.


Add-WindowsFeature Web-Server,Web-Mgmt-Tools,Web-Mgmt-Console,Web-WebServer,Web-Common-Http,Web-Default-Doc,Web-Static-Content,Web-Performance,Web-Stat-Compression,Web-Dyn-Compression,Web-Security,Web-Filtering,Web-Windows-Auth,Web-App-Dev,Web-Net-Ext45,Web-Asp-Net45,Web-ISAPI-Ext,Web-ISAPI-Filter,Web-Includes,InkandHandwritingServices,NET-Framework-Features,NET-Framework-Core


5. Restart the server

After the server has restarted, you should notice that the IIS server role is active.


B. Install Office Web Apps Server

1. Obtain Office Web Apps Server Setup Files

1. Connect to the Office Web Apps Server (MBP-OWA) and login as the Setup User Account (MBP\sp_admin).

2. Login to your MSDN Subscription and download the ISO file for Office Web Apps Server 2013 with SP1, or otherwise obtain the setup files for OWA.

3. Also obtain the Product Key


2. Run Setup

1. Mount the Office Web Apps Server ISO file.
a

2. Launch Setup.exe

3. At the UAC prompt, click Yes

4. Accept the License Terms

5. Choose a file location and click Install Now 


6. When setup displays “Thank you…” click Close  


3. Download and install Office Web Apps Server updates

If you installed the pre-SP1 version of Office Web Apps, you must download and install the Office Web Apps Server update KB2810007. Note that we installed Office Web Apps Server 2013 with SP1, so KB2810007 will not install.

Check for the most current Office Web Apps Server updates by reviewing the 2013 list on the TechNet Update center for Office, Office servers, and related products.


C. Create the Office Web Apps Server Farm

This section follows the procedure for a single-server OWA farm that uses HTTP to provide service to SharePoint. (If your farm requires HTTPS, multiple OWA farms, or Lync support, refer to the TechNet article Deploy Office Web Apps Server.)

1. If not already connected to the Office Web Apps Server, connect to the Office Web Apps Server (MBP-OWA) and login as the Setup User Account (MBP\sp_admin).

2. Open Windows PowerShell as Administrator

3. Enter the following PowerShell command to create a single-server OWA farm. Specify name of your OWA server in the –InternalURL parameter 
      
New-OfficeWebAppsFarm -InternalURL "http://mbp-owa" -AllowHttp -EditingEnabled


4. At the Setting EditingEnabled prompt, enter Yes 


5. Verify that the Office Web App farm was created successfully by using a web browser to access the Office Web Apps Server discovery URL

        http://mbp-owa/hosting/discovery


D. Configure SharePoint Farm to use the Office Web Apps Server

1. Open a Remote Desktop connection to the Central Administration server (MBP-CA). Login as the SharePoint Setup Account: sp_admin.

2. Open the SharePoint 2013 Management Shell as Administrator

3. At the UAC prompt, click Yes.

4. From the SharePoint 2013 Management Shell, change to the directory where the PowerShell scripts reside, and  run 

        ConfigureFarmToUseOWA.ps1 

Note: the only important PowerShell command in the script is as follows:
New-SPWOPIBinding –ServerName mbp-owa –AllowHTTP

This command should display a list of bindings in the PowerShell window:


Note that the MBP farm does not (yet) use SSL (does not use https). Therefore, we must specify the –AllowHTTP parameter to allow SharePoint 2013 to receive discovery information from the Office Web Apps Server farm by using HTTP. If you forget to specify –AllowHTTP, SharePoint 2013 will try to use HTTPS to communicate with the Office Web Apps Server farm and without SSL, this command will fail.

5. Veiw the WOPI zones for the SharePoint bindings

Office Web Apps Server uses the concept of zones to determine which URL (internal or external) and which protocol (HTTP or HTTPS) to use when it communicates with the host, which in this case is SharePoint 2013. By default, SharePoint Server 2013 uses the internal-https zone. Verify that this is the current zone by running the following PowerShell command:

       Get-SPWOPIZone

After you run this command, you should see the WOPI zone displayed. It should be internal-https.


6. Change the WOPI zone to internal-http

Assuming the result of Get-SPWOPIZone was internal-https, run the following command to change the zone to internal-http. You must make this change because the zone of SharePoint 2013 must match the zone of the Office Web Apps Server farm.

     Set-SPWOPIZone –zone “internal-http”

Verify that the new zone is internal-http by running the following command:

     Get-SPWOPIZone


7. Change the AllowOAuthOverHttp setting in SharePoint 2013 to True

To use Office Web Apps with SharePoint 2013 over HTTP, you must set AllowOAuthOverHttp to True. Otherwise Office Web Apps will not work. You can check the current status by running the following PowerShell command:

     (Get-SPSecurityTokenServiceConfig).AllowOAuthOverHttp

If this command returns False, run the following PowerShell commands to set this to True.

     $config = (Get-SPSecurityTokenServiceConfig)

     $config.AllowOAuthOverHttp = $true

     $config.Update()

Run the following command again to verify that the AllowOAuthOverHttp setting is now set to True.

     (Get-SPSecurityTokenServiceConfig).AllowOAuthOverHttp


8. Verify that Office Web Apps is working

To test Office Web Apps in SharePoint 2013, make sure that you are not logged in as System Account. (Whenever the currently logged on user name appears as sharepoint\system, that user can’t edit or view the documents by using Office Web Apps.)

Login as a user who is not an administrator. In section IX – B – 1 of this guide we added several Active Directory user accounts for test purposes (Julian Iron, Karen Best, etc.). Grant those ordinary users contribute access to the Home site (if necessary), upload a few Office documents to the Documents library on the Home site, and try clicking open a document. Office Web Apps should render the document within the browser rather than launching the Office rich client application.


Next Steps


In this section we  configured an Office Web Apps 2013 Server so that Office documents in SharePoint can be displayed within the browser.

In the next section, Section XIV, we configure Business Intelligence components including Secure Store Service, Reporting Services, Excel Services, PowerPivot for SharePoint and PowerView.

Wednesday, July 22, 2015

SharePoint 2013 BI Farm Setup Guide: Section XII: Configure Search and MySites

This is section XII of the MBP SharePoint 2013 BI Farm Setup Guide. 

This section describes how to configure Enterprise Search, User Profile Synchronization and My Sites. 

Below are links to all the sections of this Guide.
XIV.  Configure Business Intelligence
XV.   Turn Windows Firewalls Back On for All Servers

As mentioned in Section I, MBP stands for "Martin's Best Practices."  I use MBP as the acronym for the enterprise, the domain and also the name of the farm. MBP does not correspond to any actual company or client. You may use this guide as a template by globally replacing "MBP" with the acronym or name of your company or client.

About This Section

Search and User Profile Synchronization in SharePoint 2013 are complex and can be problematic to get working. For this reason it is our best practice to configure Search and User Profile Synchronization now. At this very early stage in the farm-building process, we have few SharePoint features configured and no content, so there are fewer variables when troubleshooting.


A. Configure Search

This section describes how to set up Search on a dedicated search server (MBP-SEARCH) but can easily be adapted to different configurations by modifying the scripts.

We have divided the search configuration steps into three scripts to give you more of a chance to stop if anything did not work and fix it before proceeding to the next step.

CreateSearch1 creates the search service application pool and starts the search service instances
CreateSearch2 creates the search service application and the search service application proxy
CreateSearch3 creates the search component topology and activates the new topology


A note re: SharePoint Foundation 2013: scripts CreateSearch2 and CreateSearch3 will not work if you are installing SharePoint Foundation 2013.  To configure search with SharePoint foundation, use CreateSearch1, then Central Admin --> Configuration Wizards --> Launch the Farm Configuration Wizard. "How do you want to configure your SharePoint farm?"   Yes Walk me through --> Start the Wizard. Wizard displays the "Service" page. Under "Service Account" select Use existing managed account and select your Search Service Application account (not the Crawl/Content Access Account). Then Next.  Then Skip.  Then Finish.


1. CreateSearch1 

1. Open a Remote Desktop connection to the Search server (MBP-SEARCH). Login as the SharePoint Setup Account: sp_admin.

2. From the Windows Start page, right-click SharePoint 2013 Management Shell and select Run as Administrator

3. At the UAC prompt, click Yes

4. In the SharePoint Management Shell, navigate to the folder (F:\Scripts) where the scripts reside, enter the following command:


    .\CreateSearch1.ps1


Initially, the Search Service Instance on MBP-SEARCH will have Status ‘Provisioning’ as shown by Get-SPEnterpriseSearchServiceInstance.
Be patient. The next script, CreateSearch2.ps1, creates the Search Service Application and we have seen problems that seem to arise from rushing ahead with the creation of the Search Service Application before the Search Service Instances are fully running. Wait for Get-SPEnterpriseSearchServiceInstance –Local to return a result showing the Search Service running on MBP-SEARCH with Status = Online

5. Wait for the Search Service Instances to be fully running. To confirm that the Search Service Instances are running OK on the search server, 

    a. From the SharePoint Management Shell on the Search server, enter the following command:

    Get-SPEnterpriseSearchServiceInstance –Local

This should return a result showing the Search Service status = Online. 
If Status = Provisioning, it’s not ready yet.

    b. For additional confirmation, open Central Administration (http://mbp-ca) and click Manage services on server.

    c. From the Services on Server page, in the upper right corner, locate the Server: prompt. Pull down the drop-down arrow and select Change Server

    d. Select the search server (MBP-SEARCH in this case)

    e. When the Services on Server page is re-displayed, scroll down to locate Search Host Controller Service, Search Query and Site Settings Service, and SharePoint Search.  We require all three of these to have status = Started.

The following screen shot shows the Services on Server page while the services are not ready:


    f. I may have been impatient, but I re-booted the search server and subsequently got the all-clear status shown below. First, on the MBP-SEARCH server, the Get-SPEnterpriseSearchServiceInstance –Local command showed Status = ‘Online’:


    g. Then, in the Central Administration Services on Server page, all Search services have status = Started


2. CreateSearch2


Note: if you are using SharePoint Foundation 2013, scripts CreateSearch2 and CreateSearch3 will not work. To configure search with SharePoint foundation, after using CreateSearch1, go to Central Admin à Configuration Wizards à Launch the Farm Configuration Wizard.

The following steps work fine if you are using SharePoint Enterprise.

1. When all three Search Service Instances are fully running, open the SharePoint Management Shell and navigate to the folder (F:\Scripts) where the scripts reside

2. Enter the following command:

    .\CreateSearch2.ps1


3. Verify that the Search Service Application is created and is online by entering the following command:

  Get-SPEnterpriseSearchServiceApplication


Note the “Active Topology” has no components. This is because the next step (CreateSearch3.ps1) creates the topology.


3. CreateSearch3

1. From windows explorer on the search server (MBP-SEARCH), create a folder named SearchIndex located in the F: (data) drive. The CreateSearch3.ps1 script requires that this folder already exist.


NOTE: If you need to locate your Search Index in a different folder or on a different drive, you must edit the CreateSearch3.ps1 script and adjust the following line (line 24) where it sets the value of the indexRootDirectory variable. Save your changes to the script.


2. In the SharePoint Management Shell, navigate to the folder (F:\Scripts) where the scripts reside

3. Enter the following command:

.\CreateSearch3.ps1


4. If CreateSearch3 displays the following error from line 51 

“New-SPEnterpriseSearchIndexComponent … Exception setting “Root Directory”: “New index location must be empty”

Try the following work-around:
    a. From Central Administration, navigate to Services on server.
    b. From the  Services on Server page, use the Server: prompt to select Change Server and select the search server (MBP-SEARCH in this case)
    c. From the Services on Server page, scroll down to locate Search Host Controller Service and click Stop 
    d. Back on the Search Server (MBP-SEARCH), delete everything out of the F:\SearchIndex folder.
    e. Re-run the CreateSearch3.ps1 script with the Search Host Controller Service stopped 

Line 51 and the rest of CreateSearch3.ps1 should run to completion successfully in several minutes. I found the Search Host Controller Service started running again automatically and I did not have to go back to Central Administration. 


4. Manually change the Default Content Access account

The credentials of the Default Content Access account (AKA the Crawl Account) are the credentials the crawler uses to read content for indexing. Something about provisioning the Search services configures the wrong account credentials in the Search Service Application, ususally to either the search account (sp_search) or the farm account (sp_farm).  Follow these steps to manually change this to the Crawl account e.g. sp_crawl:

1. Open Central Administration (e.g. http://mbp-ca).  

2. From Central Administration, click Manage service applications.


3. From the Manage Service Applications page, click the Search Service Application


4. From the Search Service Application: Search Administration page, note that the field Default content access account is not the crawl account: it is the service account we configured for running the search service (sp_search in this case). Fix this to make it the crawl account (sp_crawl in this case).

5. To the right of the label Default content access account, click the incorrect value (MBP\sp_search). SharePoint opens the Default Content Access Account dialog.


6. From the Default Content Access account dialog, enter the crawl account (mbp\sp_crawl in this case) and password. Click OK.


5. Run a Full Crawl


1. From the Search Service Application: Search Administration page, click Content Sources on the left side quick launch bar:

2. From the Search Service Application: Manage Content Sources page, click Start all crawls

The Status changes to “Starting”. Later, status will change to “Crawling full”.

3. After a few minutes, click refresh. The status should change back to “Idle” indicating the crawl is complete. Note we are crawling a farm that has no content, so a full crawl should complete in 2 – 3 minutes.


6. Test Search

To verify that search is working, perform a search from the home site. Since we have not loaded any content there won’t be much to search, but I have found that the word “item” appears on SharePoint pages even when no content has been added to the farm, so a few hits should be found.


[Option] You may now create a Crawl Schedule if you wish. In this guide, we wait until we have configured People Search (section XII – E) before creating the crawl schedule, but if you do not plan to configure People Search, or if you just want to get started adding content, follow these steps to create a crawl schedule now:

    a. Navigate to Central Administration --> Manage service applications --> Search Service Application

    b. From the Search Service Application: Search Administration page, click Content Sources in the left side navigation.

    c. From the Search Service Application: Manage Content Sources page, click open Local SharePoint Sites 

    d. Scroll to the bottom of the Search Service Application: Edit Content Source page

    e. In the Crawl Schedules section, we typically accept the default Enable Incremental Crawls since that is less resource-intensive. You may choose Enable Continuous Crawls if your application requires it and your hardware is adequate.
    
    f. Under Incremental Crawl, click Create schedule

    g. From the Manage Schedules page, accept the default Type = Daily but then check the box labeled “Repeat within the day” with the default Every 5 minutes for 1440 minutes. This is appropriate for most applications. Click OK.


    h. Under Full Crawl, click Create schedule

    i. From the Manage Schedules page, accept the default Daily schedule (Run every day) with no repeat. This is appropriate for most applications. Click OK.

    j. From the Search Service Application: Manage Content Sources page, click OK.

    k. Click Start all crawls to test that search is working.


7. Create the Search Center Site Collection

A good, common practice is to establish one Search Center Site Collection for use by all site collections in the farm. This guide configures a managed path with explicit inclusion so that the search center site collection is at the URL http://home.mbp.com/search. (If we used wildcard inclusion the search center would be located at a less intuitive URL such as http://home.mbp.com/sites/search.)

1. Connect to the Central Administration server (MBP-CA) logged in as the SharePoint Setup Account: sp_admin.

2. Run SharePoint 2013 Management Shell with Run as Administrator

3. Navigate to the folder (F:\Scripts) that contains the PowerShell Scripts.

4. Run the CreateSearchCenterSiteCollection.ps1 PowerShell script.


The CreateSearchCenterSiteCollection script creates a site collection with title “Search Center” at managed path /search  

5. Configure the Global Search Center URL in the Search Service

Now that you have created the Search Center site collection, configure the farm to direct all searches to the search center for display of the search results.

    a. Open Central Administration in a browser and navigate to --> Manage service applications --> Search Service Application 

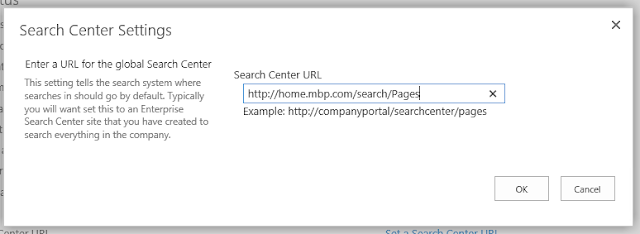
    b. Next to the label Global Search Center URL, click the link marked Set a Search Center URL.

    c. In the Search Center Settings dialog, type in the URL of the search center in the form: http://home.mbp.com/search/Pages

    d. Click OK 

6. Open the Home site collection (home.mbp.com) and click the Setting (gear) icon in the upper right corner to navigate to Settings --> Site settings

7. From the Site Settings page, under Site Collection Administration, click Search Settings 

NOTE: go to the “Site Collection Administration Search Settings” page, not the “Site Settings Search Settings” page:

8. From the Site Collection Administration Search Settings page, in the “Enter a Search Center URL” section, set the search center URL appropriately, e.g.: http://home.mbp.com/search/Pages

9. Leave the default values as they are in the “Which search results page should queries be sent to?” section (the box marked “Use the same results page as my parent” is checked.)

10. Click OK

Note: this configuration provides the drop-down menu inside the search box. Users search ‘this site’ by default, which takes them to the site-collection search results page to display those results (rather than the search center). In this case the site-collection search results page prompts the user to expand your search. If the user clicks expand your search this re-directs to the user to the Search Center results page and expands the scope to everything.


8. Grant All Users Read Permission to the Search Center

1. Open the Search Center (in this case, http://home.mbp.com/search).

2. From the Search Center, click the Setting (gear) icon in the upper right corner to navigate to Site settings

3. From the Site Settings page, select People and groups

4. From People and Groups page, select the Search Center Visitors group from the left side navigation

5. From the People and Groups > Search Center Visitors page, click New 

6. From the Share ‘Search Center’ dialog, enter Everyone

7. Click Share


B. Configure User Profile Synchronization


User Profile Service provisioning is notoriously problematic. As result of SharePoint internal issues (most dating back to SharePoint 2010), several required steps do not follow generally accepted SharePoint best practices but are not avoidable.  The step where you start the User Profile Synchronization Service is normally the most problematic. References to harbar.net and other resources are provided below.

One specific problem (see http://www.harbar.net/archive/2010/10/30/avoiding-the-default-schema-issue-when-creating-the-user-profile.aspx) requires running the CreateUserProfileServiceApplication.ps1 script as the Farm account.


You must be logged in as the FARM account – sp_farm – when you to run the CreateUserProfileServiceApplication.ps1 script


In this section we configure the SharePoint User profile service including synchronization connections that will synchronize between the SharePoint User Profile store and one or more Active Directory containers; typically an Active Directory Organizational Unit (OU).

If you are building a farm in a corporate enterprise network, you must work with the domain administrators to identify the set of containers to configure in your synchronization connections.  Try to identify AD containers that only contain users; avoid synchronizing AD objects such as groups, computers and printers. If your enterprise AD is set up in such a way as you must synchronize OUs that include both users and non-users (e.g. groups), you can configure Connection Filters on your Synchronization Connections that filter out the non-users.

Fortunately, in this guide, we created a new domain – MBP.com – from scratch. Since this environment has no user accounts in Active Directory initially, we take this opportunity (in part 1 below) to configure a handful of users (first name, last name, logon name and password) in Active Directory now so that we can test user profile sync is working. 

1. Prepare Users in Active Directory if Needed

This step details how to create a set of test user accounts in the mbp.com domain. You may skip this step (step 1) if you are working with a production domain or a domain where Active Directory already contains the user accounts you will need synchronized into SharePoint.

For the MBP farm, we create an Organizational Unit – MBP Users -- specifically for the purpose of containing all our users, and create all our test user accounts inside that OU. To do this in the MBP domain, follow these steps:

1. Open a Remote Desktop connection to Active Directory server (MBP-DC in this case) and login using the domain admin account (mbp\mpadmin).

2. From the upper right corner of Server Manager, open the Tools menu and select Active Directory Users and Computers

3. From the Active Directory Users and Computers, right mouse-click on the domain mbp.com and select New --> Organizational Unit

4. Name the new Organizational Unit MBP Users and click OK 

5. In Active Directory Users and Computers, right-mouse-click on OU MBP Users and select New --> User

6. In this way, create new Active Directory accounts for each of the test users you need. I collected the following names from Microsoft stock personas (together with matching photos) and added them to my MBP domain Active Directory.  You are free to use these as test users in your test domain:

    Julian Iron   mbp\juliani
    Karen Best   mbp\karenb
    Kelly Kite     mbp\kellyk
    Molly Cope   mbp\mollyc
    Renee Lee     mbp\reneel

7. When all your users are created, your AD has a simple container – MBP Users – that contain only users, no groups, no computers and no printers. This will be convenient when you select this OU during step XII – B - 7 when configuring Synchronization Connections.

2. Run CreateUserProfileServiceApplication as FARM account

In this step we login with the Farm Account and run the PowerShell script that creates the User Profile Service Application Pool, starts the User Profile Service instance and creates the User Profile Service Application and Proxy. You must run this PowerShell script on the SharePoint App Server that will run the User Profile Synchronization service. In the case of MBP, we run this script on MBP-CA because our plan is to run this service on the Central Administration SharePoint server.

1. Connect to the SharePoint Server that will run the User Profile Synchronization service (MBP-CA, in this case) and login using the Farm Account (NOTE: do NOT login as the Setup User Account).

2. Right-mouse click on SharePoint 2013 Management Shell and select Run as Administrator. At the UAC prompt, click Yes.

3. In the SharePoint 2013 Management Shell window, navigate to the folder that contains the PowerShell scripts (F:\Scripts in this case).

4. Run the CreateUserProfileServiceApplication.ps1 PowerShell Script to create the User profile Service application and the User profile Application proxy.


5. Verify that the User Profile Service Application was created successfully by opening Central Administration --> Manage Service Applications. Verify that User Profile Service Application is displayed in the list of Service Applications.

3. Configure Administrators of the User Profile Service Application

This section explains how to add several accounts including the Setup User Account (sp_admin in this case) to the list of Administrators for the User Profile Service Application.

1. From the Central Administration -->Manage Service Applications page, select the User Profile Service Application – but don’t open the Manage Profile Service page -- by clicking slightly to the right of the User Profile Service Application then clicking the Administrators button on the ribbon:


SharePoint displays the Administrators for User Profile Service Application dialog.

2. Type the Setup User account (sp_admin in this case) into the box and click the “Check Names” icon to verify. Then click Add


3. With the Setup User account selected, select the check box marked “Full Control”.

4. While you are in this dialog, add the Farm account with Full Control and

5. Add the Crawl account (sp_crawl) with “Retrieve People Data for Search Crawlers” permission.


6. Click OK.


4. Fix the two Forefront Identity Manager (FIM) Services

This step describes a fix we have to make to two Windows services in order to make the next step (Start the User Profile Synchronization Service) work. Perform this step on the SharePoint Application Server that will run the User Profile Synchronization service (MBP-CA in this case).

Behind the scenes, the SharePoint User Profile Service and User Profile Synchronization service use two Forefront Identity Manager (FIM) services. You should be able to see these two services in the Windows Services manager (services.msc).  

1. If you are not already logged in to the Central Admin server (MBP-CA), open a remote desktop connection and login using either the farm account or the setup user account.

2.  From Server Manager, in the upper right corner, open the Tools menu and select Services.
Windows displays the Services manager.

3. From the Services applet, locate the Forefront Identity Manager Service and the Forefront Identity Manager Synchronization Service:

Note that, for both services, the Status column is Disabled.  Furthermore, Log On As = Local System for the first service.  We found that we had to change the Log On As to the FARM account e.g. sp_farm and change the Startup Type to Automatic for both services in order for the next step, “Start the User Profile Synchronization Service” to succeed.

4. From the Services manager in Windows, double-click on Forefront Identity Manager Service to open the Service Properties


5. On the [General] tab, change the Startup type to Automatic.

6. On the [Log On] tab, select Log on as: This account.


7. In the “This account” field, enter the FARM ACCOUNT credentials (e.g. mbp\sp_farm) and the password.

8. Click OK

9. From the Services manager, double-click to open the Forefront Identity Manager Synchronization Service.


10. On the [General] tab, change Startup type: to Automatic (Delayed Start)

11. On the [Log On] tab, select Log on as: This account.

12. In the “This account” field, enter the FARM ACCOUNT credentials (e.g. mbp\sp_farm) and the password.


13. Click OK

14. If Services displays a message about the farm account has been granted the Log On As A Services right, click OK


In the Services applet, both FIM services should now show Startup Type = Automatic or Automatic (Delayed Start) and Log On As =mbp\sp_farm.

16. Close the Services applet. 


5. Start the User Profile Synchronization Service

Follow these steps to manually start the User Profile Synchronization service on the server where User Profile Synchronization will run (for MBP, the Central Admin server, MBP-CA).

This manual procedure follows steps documented on TechNet here: http://technet.microsoft.com/en-us/library/ee721049(v=office.15).aspx

1. Launch IE using Run as Administrator

2. Navigate to Central Administration

3. From Central Administration, in the System Settings section, click Manage services on server.

4. On the Services on Server page, in the Server box, select the server on which the User Profile synchronization will run (MBP-CA in this case). If you have a separate SharePoint Application server, this is normally the application server.

5. Find the User Profile Synchronization Service If the value of the Status column is Stopped, click Start in the Action column.


The User Profile Synchronization Service page is displayed. 
The Select the User Profile Application section should display the User Profile Service Application

4. In the Service Account Name and Password section, the farm account is already entered and cannot be edited. Enter the password for the farm account in the Password box, and enter it again in the Confirm Password box

5. Click OK 

SharePoint displays the Services on Server page. Scroll down to see that the User Profile synchronization service has a status of Starting.

Is may take 10 minutes for the status to change from "Starting" to "Started".  The Harbar.Net blog states that you must run IISRESET at this step, but that was for SharePoint 2010 and we have seen that IISRESET is not normally required with SharePoint 2013.

To determine whether the User Profile synchronization service has started, refresh the Services on Server page. When the User Profile synchronization service has a status of Started you know the service is running.

If the User Profile synchronization service reverts to the state Stopped before it gets to the state Started, take a deep breath. You may have a lot of troubleshooting to do. The only consolation I can give you is: you are not alone. This is a notoriously problematic area for SharePoint going back to SP 2010. The best blogs on the topic as of 2/8/2013 are still the SP 2010 blogs by Spence Harbar:

http://www.harbar.net/articles/sp2010ups.aspx
http://www.harbar.net/archive/2010/10/30/avoiding-the-default-schema-issue-when-creating-the-user-profile.aspx

If the User Profile synchronization service remains stuck in the Starting state, try rebooting the server.


6. Remove the Farm account from the Administrators Group

After the User Profile synchronization service is started, you may log out of the server if you were logged in as the Farm Account, then log back in as the Setup User (sp_admin) account and remove the Farm account from the local Administrator’s group on the computer that is running the synchronization service (normally, the App server.) Note: this is the earliest possible stage at which you may remove Farm account from local Admin group; you may safely do this step later. One reason you may wish to postpone this step until later is certain Business Intelligence configuration steps may require the Farm account to be a member of the local Administrators group. 

Repeat the following steps on each SharePoint server in the farm:

1. Connect to the server and login with the Setup User account (sp_admin).

2. From Server Manager, in the upper right corner, open the Tools menu and select Computer Management.

3. From Computer Management, in the left-side navigation panel, expand the Local Users and Groups node.

4. Select the Groups folder.

5. Double-click to open the Administrators group.


6. From the Administration Properties dialog, select the Farm Account (e.g. sp_farm) and click Remove.

7. Click OK.

8. Exit Computer Management. 


7. Create a Synchronization Connection and start Profile Synchronization

1. If not connected to the Central Administration server (MBP-CA), open a connection and log in using the SharePoint Setup Account (sp_admin in this case).

2. From Central Administration, under Application Management click Manage service applications

3. Click open the User Profile Service Application 

SharePoint displays the Manage Profile Service: User Profile Service Application page.  Note in the upper right of the page, under Profiles, the Number of User Profiles is probably a small number such as 2 or 3. 


This small number of user profiles corresponds to the number of accounts you have used to login to SharePoint so far, specifically:
    sp_farm
    sp_admin

At the end of this section you will see this number of profiles grow to represent all of the users synchronized from Active directory.  

4. From the Manage Profile Service:User Profile Service Application page, in the Synchronization section, click Configure Synchronization Connections 


SharePoint displays the Synchronization Connections page. Initially, you have no connections so it will display, “The query returns nothing.”


5. On the Synchronization Connections page, click Create New Connection
SharePoint displays the Add new synchronization connection page


6. In the Add new synchronization connection page, enter the following: 
    a. Connection Name =  AD Profile Connection
    b. Type = Active Directory
    c. Connection Settings
        i. Forest Name = mbp.com 
        ii. Leave “Auto discover domain controller” selected 
        iii. Authentication Provider type = Windows Authentication
        iv. Synchronization Account Name = mbp\sp_adsync 
                                    Synchronization acct password =******
                                    Connection Port = 389
                                    Use SSL? = no (leave un-checked)

The Forest Name field must contain the root domain name of the domain that contains your users. This should be the domain name you planned in the physical architecture (mbp.com in this case) and the Root Domain Name you specified when configuring your Active Directory Domain Controller (the value you entered for the the name of the root domain when promoting the AD server to a domain controller in the Active Directory Domain Services Configuration Wizard.)


7. Click Populate Containers

The box will display a tree of A.D. containers. Navigate this tree and select just those containers that have the User Accounts you want synchronized into SharePoint User Profile Store. For the MBP domain, in step IX – B – 1 we created a container – MBP Users – specifically to use when configuring Synchronization Connections. We know MBP Users contain only users, no groups, no computers and no printers. 

8. Expand the tree and select MBP Users.  Do not click “Select All”.


9. With the MBP Users container selected, click OK.

“Working on it…”

The Synchronization Connections page will display your new connection.


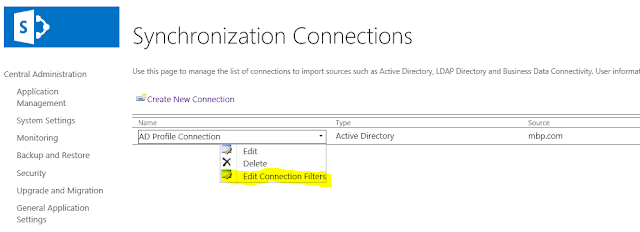
10. For the MBP domain, there is no need for a Connection Filter on this connection so we are done with step 7. In your enterprise farm, however, you will likely require a Connection Filter.  If your AD is set up in such a way as you must select a container (or containers) that contain a mix of accounts – some that should be synchronized into SharePoint and others that should not be synchronized into SharePoint – then you will probably require a Connection Filter.  To create a Connection Filter, select the drop-down menu in the Name column of the Synchronization Connection and select Edit Connection Filters from that drop-down.

SharePoint displays the Edit Connection Filters page. The details of exactly how you fill in the exclusion filters generally depends on your organization and specifically depends on your Active Directory. The Edit Connection Filters page gives you a UI to construct an exclusion filter expression. I recommend you coordinate closely with your organization’s Active Directory administrators to get this expression right.


8. Start User Profile Synchronization

1. Navigate back to Central Administration --> Manage Service Applications --> User Profile Service Application

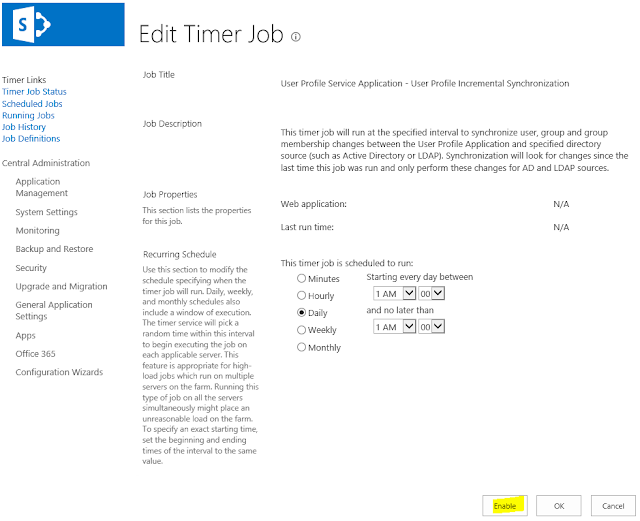
2. Under Synchronization, click Configure Synchronization Timer Job
In the Edit Timer Job page, click Enable


SharePoint will display the Job Definitions page. 

3. Navigate back to Central Administration --> Manage Service Applications --> User Profile Service Application

4. From the Manage Profile Service: User Profile Service Application page, under Synchronization, click Start Profile Synchronization

5. On the Start Profile Synchronization page, select Start Full Synchronization


6. Then click OK

SharePoint will display the Manage Profile Service: User Profile Application page again.

You may refresh after a few minutes to see if the number of User Profiles has increased from the initial value (which was probably 2 for the sp_farm and sp_admin).

This indicates the service is populating the user profile database from your Active Directory.

Note: if User Profile Service does not synchronize any users (the Number of User Profiles remains stuck at 2) and you see errors in the log such as The management agent MOSSAD-AD Profile Connection failed on run profile DS_FULLIMPORT because of connectivity issues try the following: Re-started the Managed Metadata service,
Re-boot the server running the User Profile Synchronization service (the Central Admin server) and try again to Start Profile Synchronization --> Start Full Synchronization --> OK.


7. Check the synchronized user profiles by clicking Manage User Profiles to see the user profiles.

You need to enter part or all of the account name into the “Find profile” text field and click Find.  You may enter just the domain e.g. MBP, and it will match all accounts that start with the domain as shown above.


9. Map User Profile Properties


As an optional customization step, you may configure additional fields from Active Directory to synchronize with the SharePoint User Profile database. Many standard Active Directory profile fields are mapped by default to SharePoint User Profile Database fields. 


C. Setup My Sites

Now that the User Profile Service is running, set up My Sites.

1. Navigate to Central Administration --> Manage Service Applications --> User Profile Service Application

2. On the Manage Profile Service: User Profile Service Application page, in the My Site Settings section, click Setup My Sites.

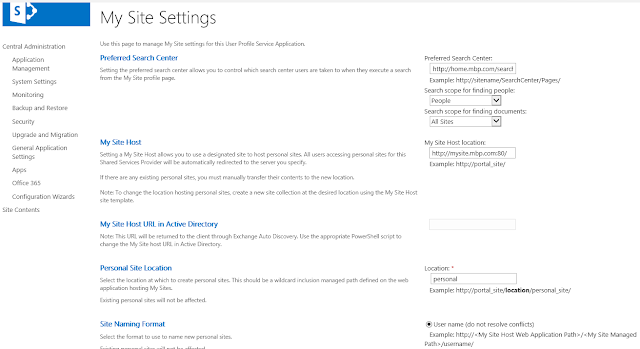
3. On the My Site Settings page, 
    c) Preferred Search Center = http://home.mbp.com/search/pages
    d) Search scope for finding people = People
    e) Search scope for finding documents = All sites
    f) My Site Host location = http://mysite.mbp.com
    g) Personal Site Location = personal
    h) Site Naming Format = User Name (do not resolve conflicts)
    i) My Site Cleanup – Secondary Owner = mbp\sp_admin
    j) Keep other defaults

4. Click OK


D. Enable the User Profile Service Application - Activity Feed Job


1. Navigate to Central Administration --> Monitoring --> Review job definitions

2. On the Job Definitions page, in the upper right corner at the View: label, select Service. The Service list appears. If the Service list is blank or does not display the User Profile Service, in the upper right corner at the Service: label, click No selection, then select Change Service. SharePoint displays the Select Service dialog. On the Select Service dialog, use the arrows in the upper-right corner to page through until you locate User Profile Service, and then click it. 

3. The Job Definitions page updates with the User Profile service jobs.

4. Click the User Profile Service Application – Activity Feed Job

5. Verify the job is enabled (page displays a Disable button but no Enable button.)

6. You may adjust the Recurring Schedule or accept the default (e.g. every 10 minutes and click Enable.  

7. If the job is already enabled, click OK.


E. Configure People Search

Now that you have configured Search, created the User Profile Service and started User Profile Synchronization, you may now configure people search so that search results include people.

1. Create a Crawl Rule to authenticate to the User Profile service application


This section more or less follows http://technet.microsoft.com/en-us/library/hh582311.aspx 

1. Navigate to Central Administration --> Manage service applications --> Search Service Application 

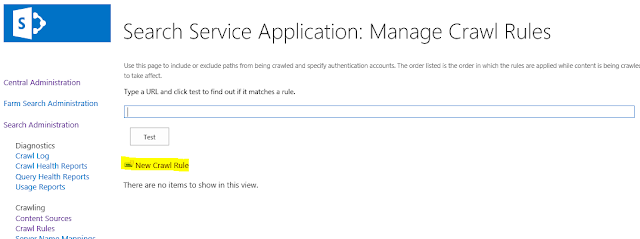
2. From the Search Service Application: Search Administration page, on the left side of the page under Crawling click Crawl Rules


3. From the Search Service Application: Manage Crawl Rules page, click New Crawl Rule


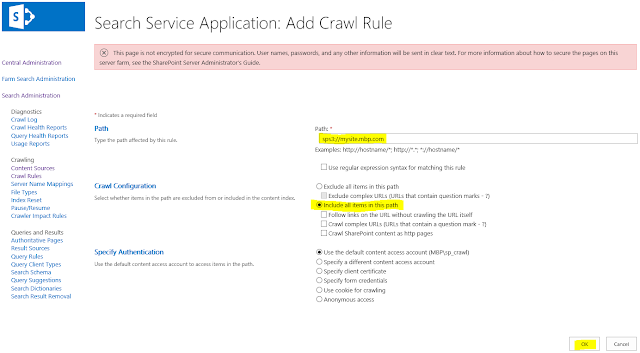
4. On the Search Service Application: Add Crawl Rule page, enter the following  

    a. Path = sps3://<host-name-of-your-mysite-web-app>


NOTE 1: SharePoint uses the SPS3 protocol for crawling people profiles.
NOTE 2: You must specify SPS3S instead of SPS3 if you have enabled SSL for the My Sites,

5. In the Crawl Configuration section, select Include all items in this path.

6. Keep the default selection of “Use the default content access account (MBP\sp_crawl)

7. Click OK


2. Add the Start Address for the User Profiles (My Site with SPS3) to the Search Content Source


1. Navigate to Central Administration --> Manage service applications --> Search Service Application

2. From the Search Service Application: Search Administration page, click Content Sources in the left side navigation.

3. From the Search Service Application: Manage Content Sources page, click open the content source named Local SharePoint Sites


4. On the Search Service Application: Edit Content Source page, you will see, under Start Addresses, the URLs of the two web applications home.mbp.com and mysite.mbp.com.  

5. Add the start address of the User Profile service -- in the form sps3://<hostname> -- to the Start Addresses list.

NOTE 1: SharePoint uses the SPS3 protocol for crawling people profiles.

NOTE 2: You must specify SPS3S instead of SPS3 if you have enabled SSL for the My Sites web app.

The hostname must be the URL for the MySite web application. In this case,  sps3://mysite.mbp.com.


6. If you have not previously created a Crawl Schedule, do so now. 

7. You may choose Enable Continuous Crawls or you may specify an Incremental Crawl Schedule e.g. to Repeat every 5 minutes and Full Crawl schedules to repeat every Day:

8. Click OK.

9. From the Search Service Application: Manage Content Sources page, if you configured an incremental crawl schedule, you may click Start all crawls to test that user profile crawling is working. Otherwise if you selected Continuous Crawl, the page will display Status = Crawling Continuous.

F. Add the sp_svcapp to the Connections Permissions for the User Profile Service


In order to make the Newsfeed in MySites work, you must add the account that is running the User Profile Service (in our case, sp_svcapp) to the set of Connection Permissions for the User Profile Service.

1. Central Administration --> Manage Service Applications

2. Click to the right of the User Profile Service Application to select it but not open it. Then click the Permissions button on the ribbon.

3. In the Connection Permissions for User Profile Service dialog, add the mbp\sp_svcapp account:


4. With the sp_svcapp account selected in the list, check the box next to Full Control 

5. Click OK.

Next Steps

This concludes section XII: Configure Search and MySites. In this section we configured Enterprise Search, User Profile Synchronization, My Sites and People Search.

In the next section, section XIII, we will configure the Office Web Apps 2013 Server so that Office documents in SharePoint can be displayed within the browser.