This section describes our best practice for setting up Organizational Units (OUs) in Active Directory, and Group Policy Objects (GPOs) in Group Policy Management.
This guidance is critical when configuring production environments. SharePoint (and SQL) service accounts must run with the permissions they need on the SharePoint (and SQL) servers.
Below are links to all the sections of this Guide.
|
XIV. Configure Business Intelligence
XV. Turn Windows Firewalls Back On for All Servers
|
As mentioned in Section I, MBP stands for "Martin's Best Practices." I use MBP as the acronym for the enterprise, the domain and also the name of the farm. MBP does not correspond to any actual company or client. You may use this guide as a template by globally replacing "MBP" with the acronym or name of your company or client.
About This Section
This section describes how to configure OUs and Group Policy Objects to ensure the SharePoint service accounts (such as sp_svcapp and sp_webapp) have the permissions they need without making them local administrators on the SharePoint servers.Too often these problems are “solved” by adding the service accounts to the local Administrators group, violating the principle of least privileges.
This section describes one way to explicitly grant the SharePoint (and SQL) service accounts the permissions they need on just the SharePoint (and SQL) servers without giving those accounts extra permission on any other servers in the network. The approach described here is just one way to meet this requirement; your enterprise network, policies and Active Directory structure may require a somewhat different approach. We describe this approach in detail here to help you think about how you will set up a policy that works in your farm. This particular approach is simple and it works. You will probably need to adapt it to your particular needs.
A. Configure OUs
We will create two top-level Organizational Units (OUs) in Active Directory: one called SharePoint and the other called SQL Server. We create two child OUs under the SharePoint OU: SPGroups and SPServers. Similarly, we will create two child OUs under the SQL Server OU: SQLGroups and SQLServers. The screen shot below illustrates the resulting OU tree.

We will add all the SharePoint service accounts to the SPGroups OU, all the SharePoint Server computers to the SPServers OU, all the SQL Service accounts to the SQLGroups OU, and all the SQL Server computers to the SQLServers OU. Later, we will create a pair of Group Policy Objects and link them to the SPServers OU and the SQLServers OU, respectively.
1. Connect to the Active Directory / Domain Controller (MBP-DC in this case) and log in as the domain administrator (MBP\mbpadmin)
2. From the Server Manager Tools menu, open Active Directory Users and Computers
3. From Active Directory Users and Computers, right-click on the domain (mbp.com in this case) and select New --> Organizational Unit


5. Click OK.
6. Repeat 3 - 5 to create a peer Organizational Unit named SQL Server.
7. Right mouse-click on the SharePoint OU and select New-->Organizational Unit.

8. From the New Object – Organizational Unit dialog, enter Name: SPGroups
9. Click OK.
10. Create a second OU under the SharePoint OU and name it SPServers
11. Now right mouse-click on the SQLServer OU and select New--> Organizational Unit.
12. Create an OU under the SQLServer OU and name it SQLGroups
13. Create a second OU under the SQLServer OU and name it SQLServers
Your OU hierarchy should now resemble the screen shot below:

Now that we have this tree of OUs, we need an AD Group named SPServices that includes all the SharePoint Service Accounts.
14. Right mouse click on the SPGroups OU and select New --> Group
15. Name the new group, SPServices. Accept other defaults and click OK

16. Select the ‘Managed Service Accounts’ folder and select all the SharePoint service accounts (the ones that start with sp_) including the sp_ppvtsvcapp account.
17. Click the Add to Group button


19. AD Displays the confirmation dialog. Click OK.
Now that we have configured the SPServices group, we need to create an AD Group named SQLServices that will includes all the SQL Service Accounts.
20. Right mouse click on the SQLGroups OU and select New --> Group
21. Name the new group, SQLServices. Accept other defaults and click OK.
22. Select the ‘Managed Service Accounts’ folder and select all the SQL Server accounts:
1. sql_admin
2. sql_service
3. ssas_pvtsvc
4. ssis_service
23. Click the Add to Group button
24. From the Select Group dialog, specify the SQLServices group and click OK.
25. AD Displays the confirmation dialog. Click OK.
In the next section we will move the SharePoint Servers to the SPServers OU and the SQL Servers to the SQLServers Organizational Units, respectively.
For now, close the Active Directory Users and Computers applet.
2. Move the SharePoint Servers to the SPServers OU
Now that you have configured the SPServers OU, created all the SharePoint Server VMs and added all the SharePoint servers to the MBP.com domain, go back to Active Directory and move those servers to the SPServers Organizational Unit.
2. From the Server Manager Tools menu, open Active Directory Users and Computers
3. From Active Directory Users and Computers, open the Computers folder
4. Select all the SharePoint servers (MBP-BI, MBP-CA, MBP-SEARCH, and MBP-WFE1 and MBP-WFE2 in this case)

5. Right mouse-click to pull up the Context menu and select Move…
6. From the Move dialog, drill down into the SharePoint OU and select the SPServers OU

C. Move the SQL Servers to the SQLServers OU
1. Connect to the Active Directory / Domain Controller (MBP-DC in this case) and log in as the domain administrator (MBP\mbpadmin) if needed.
2. From Server Manager Tools menu, open Active Directory Users and Computers
3. From Active Directory Users and Computers, open the Computers folder
4. Select all the SQL servers (MBP-SQL and MBP-SSAS in this case)
5. Right mouse click to pull up the Context menu and select Move…

6. In the Move dialog, open the SQL Server folder
7. Select the SQLServers OU and click OK

D. Configure Group Policy Objects
In this section we’ll create two Group Policy Objects: one named SharePoint Server Policy and one named SQL Server Policy. The OUs we created in the previous section will simplify how we define and apply these policies.
1. Configure SharePoint Server Policy
The SharePoint Server Policy will grant permission to login as a service on all the SharePoint servers to all the SharePoint service accounts. Before you create the Group Policy Object, prepare a list of all the other accounts that already have login as a Service permission and presumably need this permission so you can to include those accounts along with your new SPServices group.
1. If you are not logged in to the SharePoint Central Admin VM (MBP-CA), connect and login using the SharePoint Setup Account - mbp\sp_admin in this case.
2. From the Server Manager, launch the Local Security Policy tool by opening the Tools menu in the upper right and selecting Local Security Policy

3. From the Local Security Policy tool, navigate to Local Policies --> User Rights Assignment
4. In the right side “Policy” pane, scroll down and locate Log on as a service
5. Double click to open Log on as a service

6. Make a screen shot or carefully note what all the accounts that are already part of the Log on as a service Properties. In the case of MBP, the list only includes NT SERVICES\ALL SERVICES. However, on other servers I have seen many other accounts including the following:
1. IIS APPPOOL\.NET v2.0
2. IIS APPPOOL\.NET v2.0 Classic
3. IIS APPPOOL\.NET v4.5
4. IIS APPPOOL\.NET v4.5 Classic
5. IIS APPPOOL\Classic .NET AppPool
6. MBP\sp_farm
7. NT SERVICE\ALL SERVICES
7. Click Cancel as you will modify this through Group Policy Objects, not directly from Local Security Policy.
8. Close the Local Security Policy application and you may log off the SharePoint Central Admin server
9. Connect to the Active Directory / Domain Controller (MBP-DC in this case) and log in as the domain administrator (MBP\mbpadmin) if needed.
10. From Server Manager -- on the upper right – open the Tools menu and select Group Policy Management


12. Right-mouse-click on Group Policy Objects and select New.
13. In the New GPO dialog, enter Name = SharePoint Server Policy
14. Click OK
15. Right-mouse click on the new SharePoint Server Policy and select Edit…
16. From the Group Policy Management Editor, drill down to Computer Configuration --> Policies --> Windows Settings --> Security Settings --> Local Policies --> User Rights Assignment
17. In the right hand Policy pane, scroll down to Log on as a service.

18. Right-mouse click on Log on as a service and select Properties
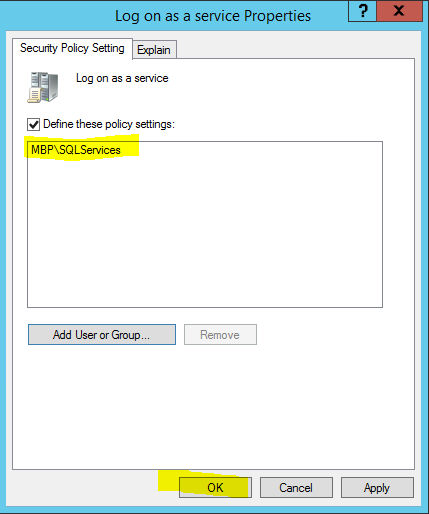
19. In the editor, check the box that says Define these policy settings, this will enable the Add User or Group button.
20. Click the Add User or Group button and then add the SPServices
21. Click Add User or Group again and add the other accounts that are currently already part of the Log on as a service local policy.
Previous
Azure Windows VM images included accounts such as “IIS APPPOOL\Classic .NET AppPool” in the local Log on as a service policy. In theory, this means you should also add these accounts e.g. “IIS APPPOOL\Classic .NET AppPool” that require Log on as a service permission to the SharePoint servers that you identified in step 6 as already part of the Log on as a service policy. In practice, however, I found that you can’t. Trying to add Users or Groups like “IIS APPPOOL\Classic .NET AppPool” fails with “The following accounts could not be validated” This may have been because Group Policy Management Editor can’t find them in AD or on the local machine, or because accounts like “IIS APPPOOL\Classic .NET AppPool” are ApplicationPoolIdentities, or it may be a limitation of Group Policy Management Editor. If you figure out how to add these other accounts, please post a reply. My advice: add all the accounts that you can and skip the others. I found I could add “NT SERVICE\ALL SERVICES” and you should do so. I was not able to add the “IIS APPPOOL” identities. Fortunately, the newer Windows 2012 R2 images do not seem to include accounts such as "IIS APPPOOL" so you can skip them with confidence. In either case, the resulting local policies do work OK.
|
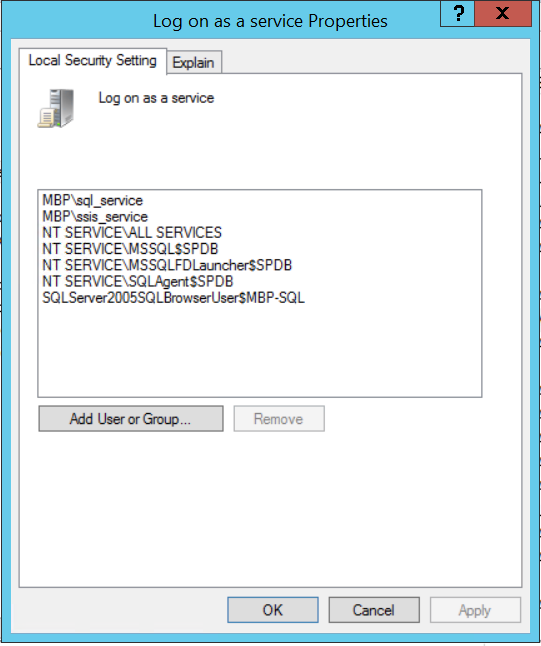
22. After adding each of these accounts to the list, your list should look something like this:

23. Click OK
24. Close the Group Policy Management Editor.
Now that we have created the SharePoint Server Policy GPO, we must link this GPO to the SPServers OU. It is a security best practice to apply this Group Policy Object to an OU that contains only the SharePoint servers so as to grant permissions on just the servers that need them.
25. From the Group Policy Management Editor, locate the SPServers OU from the left-side navigation tree. Right-click on the SPServers OU and select Link an Existing GPO… from the context menu.


27. Click OK
28. You can view the policy by double-clicking linked SharePoint Server Policy under the SPServers OU and selecting the Settings tab.

After linking these Group Policy Objects to the SPServers OU, login to each SharePoint server, Update Group Policy as follows:
a. Using the Setup Account (MBP\sp_admin), login to the server (e.g. starting with MBP-CA).
b. Open a CMD prompt and run command “Gpupdate /force”

You should not need to reboot the server.
c. Repeat steps a – b on the other SharePoint Servers MBP-WFE1, MBP-WFE2, MBP-SEARCH and MBP-BI.
After each server is updated, verify the local policy is in effect by running the Local Security Policy application on each server.
2. Configure SQL Server Policy
In this section we perform similar steps to define a Group Policy Object named SQL Server Policy. This policy has a few extra permissions in addition to Log on as a service. The SQL Server Policy should grant Log on as a service, Lock Pages in Memory, and Perform Volume and Maintenance Tasks.
First use Local Security Policy to find out what accounts have these permissions before you create your SQL Server Policy.
1. Connect to the SQL Server where the SharePoint databases reside (MBP-SQL), and login using the SQL Admin Account - mbp\sql_admin.
2. From Server Manager, launch the Local Security Policy tool by opening the Tools menu in the upper right and selecting Local Security Policy
3. Drill down to Local Policies --> User Rights Assignment. Scroll down and locate Log on as a service.
4. Right-click and select Properties to view the Log on as a service Properties
5. Take a screen shot or note what users or groups have the Log on as a service permission.
6. Repeat steps 2 – 5 for Lock Pages in Memory and Perform Volume and Maintenance Tasks permissions.

Armed with this information, create a new Group Policy Object named SQL Server Policy by following these steps:
1. Connect to the Domain Controller (MBP-DC in this case) and log in as the domain administrator (MBP\mbpadmin).
2. From Server Manager -- on the upper right – open the Tools menu and select Group Policy Management
3. Right-mouse-click on Group Policy Objects and select New.
4. In the New GPO dialog, enter Name = SQL Server Policy

5. Click OK
6. Right-mouse click on the new SQL Server Policy and select Edit…
7. From the Group Policy Management Editor, drill down to Computer Configuration --> Policies --> Windows Settings --> Security Settings --> Local Policies --> User Rights Assignment
8. Scroll down to Log on as a service.
9. Right-mouse click on Log on as a service and select Properties
10. Select Define these policy settings to enable the Add User or Group button
11. Click Add User or Group…
12. Click Browse and this time select the SQLServices group created earlier.
13. Click OK
14. Click Add User or Group… again and add as many of the users who previously had permissions as you can. I found I could add the following:
a. MBP\sql_service
b. MBP\SQLServices
c. MBP\ssis_service
d. NT SERVICE\ALL SERVICES
e. SQLServer2005SQLBrowserUser$MBP-SQL
c. The others are not recognized so skip them
15. Right-mouse click on Lock pages in memory and select Properties
16. Add SQLServices as before. Click OK.
17. Right-mouse click on Perform Volume and Maintenance Tasks and select Properties
18. Add SQLServices as before. Click OK.
19. Add Administrators to the Perform Volume and Maintenance Tasks settings as they previously had this permission.
20. Close the Group Policy Management Editor
Now that we have created the SQL Server Policy GPO, we must link this GPO to the SQLServers OU.
21. From the Group Policy Management Editor, locate the SQLServers OU from the left-side navigation tree. Right-click on the SQLServers OU and select Link an Existing GPO… from the context menu.


24. You can view the policy by double-clicking linked SQL Server Policy under the SQLServers OU and selecting the Settings tab.
25. Exit the Group Policy Management tool.
26. After configuring the SQL Server Policy, login to each SQL server and Update Group Policy as follows:
a. Connect to the SQL Server (e.g. MBP-SQL) and login using the SQL Admin Account (MBP\sql_admin).
b. Open a CMD prompt as Administrator and run command “Gpupdate /force”

You should not need to reboot the server.
c. Repeat steps a – b on the SSAS Server MBP-SSAS.
Next Steps
This concludes section VI. Configure OUs and Group Policies. With these Active Directory settings in place, the group policies allow the service accounts the permissions they need and other group policies will not override those permissions.
In the next section, Section VII of the MBP SharePoint 2013 BI Farm Setup Guide, we complete a few other administrative tasks to prepare the network for installing SharePoint and for configuring the core SharePoint services.
This comment has been removed by the author.
ReplyDelete