This and the next two sections (sections III, IV and V) describe how to provision all the infrastructure you need for a three-tier SharePoint 2013 farm in Microsoft Azure as if the farm were "on premises".
Below are links to all the sections of this Guide.
|
XV. Turn Windows Firewalls Back On for All Servers
|
The MBP farm infrastructure we planned in Section II and provision in sections III, IV and V includes:
- An Active Directory / Domain Controller
- Two SQL servers
- Five SharePoint Servers
- An Office Web Apps server
If you are building your SharePoint farm on-premises using virtual or physical servers in your datacenter, you can skim most of sections III-A and III-B below. You can, however, still follow most of the best practices in this guide.
While this network is technically in the Azure cloud, we refer to it as on-premises for three reasons:
- you can connect by remote desktop and login directly to Windows as a local administrator
- you get full control at the OS level to install and configure anything you want
- this not like Office 365 and SharePoint Online where you cannot get direct Windows-level access to your host
Microsoft Azure VMs can be particularly economical for DEV, TEST or STAGE farms because you can shut down VMs when not actively using them. Furthermore, if you have a Microsoft Visual Studio Premium MSDN subscription, you get $100 per month credit towards any Azure service.
The key step in this procedure is configuring static IP addresses for each Azure Virtual Machine server. This leverages the new Set-AzureStaticVNetIP cmdlet which was recently added to Azure PowerShell. For test or development (i.e. non-production) farms, this support for static IP addresses allows us to save Azure usage costs by shutting down all our servers when we don’t need them and starting them all back up again when we do need them.
A. Activate your Azure Account
This section describes how to activate your Azure account. Once you have your Azure account, you may start to provision your Windows Server infrastructure in Azure IaaS.
The detailed steps below describe how to activate your Azure account if you already have an MSDN subscription. If you do not have an MSDN subscription, I highly recommend it because it gets you access to terabytes of Microsoft software and MSDN Benefits that you can use to activate your Azure account.
Note that you are not required to have an MSDN subscription just to get an Azure account. Anyone with a credit card can obtain an Azure account. In fact, at the time of this writing, Microsoft is offering a free one month trial Azure subscription that gives you $200 of Azure services.

2. Click Activate your mothnly Azure credit

3. Sign in using your Microsoft account that is associated with your MSDN subscription. Microsoft Azure displays the Sign Up page

3. Fill in the form. Click Call me or Text me, they give you a code. Enter the code. Click Verify code. Then click Sign up -->
Azure displays the "Visual Studio Premium with MSDN" page.

4. Click Portal -->
Azure displays your Microsoft Azure dashboard

5. Click Virtual Machines.
Azure displays the Virtual Machines page. First time, it displays, "No virtual machines have been created."
B. Create a new Virtual Network and Active Directory forest in Microsoft Azure
This section describes how to create a Microsoft Azure Virtual Network and an isolated Active Directory (AD) forest to support the servers on that network.
These instructions create an Active Directory Domain Controller with machine name MBP-DC for the MBP domain. A Domain Controller (DC) is required for SharePoint 2013 servers and SQL servers to connect to one another and to authenticate user accounts and service accounts.
These instructions follow the steps documented in the Azure documentation article Install a new Active Directory forest on an Azure virtual network (http://azure.microsoft.com/en-us/documentation/articles/active-directory-new-forest-virtual-machine/). The detailed steps documented here do not connect the MBP domain to any on-premises network, however, Azure does support Virtual Networks connected to enterprise networks.
1. Create a Microsoft Azure Virtual Network
Since we’ll be creating a Microsoft Azure Virtual Network and a six or more Azure Virtual Machines, let’s start by creating an Azure Resource Group in which to store all these Azure objects related to our MBP SharePoint farm. All Azure Virtual Networks and VM get associated to some Resource Group, and if we don’t explicitly create the Resource Group, Azure will create it for us with a default name like, “Group”. To give our Resource group a meaningful name like “MBPI” we create it explicitly as the first step.

2. From the left side panel, click the + New button
Azure displays the “New” blade

3. From the “New” blade, scroll down, click Management.
Azure displays the “Management” blade
4. From the “Management” blade, click the Resource group

Azure displays the “Resource group” blade

5. From the “Resource group” blade, enter the name you want for your Resource Group. We’ll use MBPI.
6. Click the Create button at the bottom of the “Resource group” blade.
Azure displays the “MBPI” Resource group blade.
7. Navigate back to the Microsoft Azure portal dashboard.
All Azure Virtual Machines are attached to some Virtual network. If we just create a Virtual Machine, Azure would create a default Virtual network with a default name and attach the Virtual Machine to that Virtual network. To give our Azure Virtual network a meaningful name like, “mbp-net” we explicitly create it now. We also take this opportunity to give the subnet a meaningful name, in this case “Subnet-MBP.” Once we have our Virtual network, each time we create a new VM, we may attached it to this network.
For MBP, we will not extend connectivity to any on-premises corporate network but this would be fully supported.
1. If necessary, log in to the Microsoft Azure Portal (portal.azure.com)
2. In the upper left, click the + New button. Azure displays the “New” blade.
3. In the “New” blade, click Networking. Azure displays the “Networking” blade.
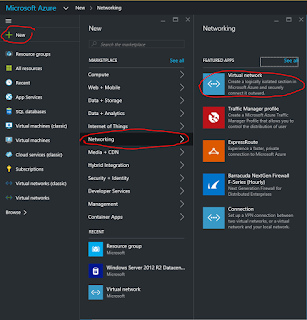
4. In the “Networking” blade, click Virtual Network. Azure displays the “Virtual network” blade.
5. In the “Virtual network” blade, the drop-down box under "Select a deployment model" should show "Resource Manager" already selected by default.
6. Click Create. Azure displays the “Create virtual network” blade.
7. In the “Create Virtual network” blade:
a. In the “Name” field, enter the name we planned: mbp-net
b. In the “Address space” field, enter 10.0.0.0/8
10.0.0.0/8 is the CDIR block that specifies the address space that gives your virtual network a usable IP address range from 10.0.0.4 - 10.255.255.255.
The requirement is for all the IP addresses you will assign to your VMs to fall within this address space.
1. If Azure warns this address space overlaps with another virtual network, specify an address range that does not overlap. If this forces you to change your plans for the IP addresses of your VMs, be sure to update your physical architecture diagram
2. Some screen shots in this guide may show Address space CIDR “10.1.0.0/16” because it avoids overlap with anther virtual network.
c. In the “Subnet name” field, enter a meaningful name. This guide uses Subnet-MBP.
d. In the “Subnet address range” field, enter 10.0.0.0/24
1. The Subnet address range must specify a range that falls within the Address space specified in the “Address space” field. The Subnet CIDR block “10.0.0.0/24” gives your subnet a usable IP address range from 10.0.0.4 – 10.0.0.254.
2. Screen shots in this guide show Subnet address range “10.1.0.0/24” because it falls within the address space “10.1.0.0/16”.
e. The “Subscription” field, by default, specifies your Azure subscription. No need to change this unless you own more than one Azure subscription.
f. Fill in the “Resource Group” field by clicking Select existing and selecting the resource group you created in step III.B.1.a. In this case MBPI.

7. Click Create at the bottom of the “Virtual network” blade.
Azure displays a “Creating Virtual Network” graphic on the portal home page while the Virtual Network is provisioned. Then it displays the “MBPI Virtual Network” blade.
In this procedure we take extra steps to assign static IP addresses to serves so they can be shut down, and re-started in different order and always come back up with the same IP addresses.
Disclaimer: Microsoft Azure has evolved rapidly. As result, the steps in this guide have been revised. These steps were correct at the time of this revision (February 2016), but your experience and the details you see on each screen many vary.
2. Sign in as needed
3. From the Microsoft Azure Portal, in the upper left corner, click the + NEW button.
4. From the “New” blade, select Compute-->Windows Server 2012 R2 Datacenter

Azure displays the "Winodws Server 2012 R2 Datacenter" blade.
a. In the "Select a deployment model" drop-down at the bottom of the blade, keep the default choice "Resource Manager" selected.
5. Click Create
Azure displays the "Create virtual machine" blade and the "Basics" blade.
6. From the “Basics” blade, in the "Name" field, enter the host name from the plan: MBP-DC. In the User Name field, enter the domain administrator User Name from the plan: mbpadmin. In the password field, enter the password from the plan. In the "Resource Group" field, click Select existing and select the resource group we created in section III-B-1-a.

8. From the “Choose a size" blade, select A1 Standard then, at the bottom of the blade, click Select

Azure closes the “Choose a size” blade.
Azure displays the “Settings” blade.
9. From the “Settings” blade, select
Disk type = Standard
Storage account = accept the default
Virtual network = select the network you configured in step III-B-1-b: mbp-net
Subnet = select the subnet configured in step III-B-1-b: Subnet-MBP
Public IP address = accept the default
Network security group = accept the default
Monitoring = accept the default
Diagnostics storage account = accept the default
Availability set = accept the default: None
Azure displays the “Change availability set” blade

10. Click OK
Azure closes the “Settings” blade.
Azure displays the “Summary” blade
11. Click OK
Azure displays the portal home page with the “Creating Windows Server 2012 R2 Datacenter” graphic while it provisions the new machine.
12. When the Azure Management Portal displays the new VM in status "Running" you may proceed to the next step


4. From the “Settings” blade, click IP addresses
Azure displays the “IP addresses” blade
5. From the “IP addresses” blade, under “Private IP address settings”, select “Assignment = Static”

6. Make sure the IP address field contains the IP address we planned for the AD/DC server (10.0.0.4 in this case.)
7. At the top of the “IP addresses” blade, click Save
Azure displays “Updating” at the top of the Network interface blade
2. From the “Settings” blade, under GENERAL, click Disks.
Azure displays the "Disks" blade.
3. From the top of the "Disks" blade, click Attach new
4. From the “Attach a new disk” blade, select the size (GB). For MBP, we entered 100 GB.
5. Be sure to leave the Host Caching parameter to None

6. Click OK
7. Wait until the "Disks" blade displays the new Data disk ok.
8. When the Azure Management Portal displays the MBP-DC Virtual machine with Status = Running, connect to the new VM as follows. From the “MBP-DC Virtual machine” blade, on the top of the blade, click Connect.
9. Your browser prompts you to open or save the RDP file with a name like MBP-DC.rdp. Save it to your desktop.
10. Launch the Remote Desktop (RDP). RDP prompts you with a confirmation that the publisher can't be identified.
11. Click Connect
Windows prompts you for credentials. Use the account MBP-DC\mbpadmin that you just specified when creating the VM.
If Remote Desktop displays a warning that the identity of the remote computer could not be verified, click Yes.
Remote Desktop connects to the Virtual Machine. Server Manager opens.
12. Initialize the disk you attached to the VM and create a new volume to store the Active Directory database, logs, and SYSVOL
a. From the Server Manage, click File and Storage Services --> Disks
b. On the DISKS list, right-click on the new disk Number 2 (will show Partition = Unknown) and click Initialize
c. When prompted to Initialize Disk, click Yes to confirm the operation.
d. After initialization is complete, right-click the disk, click New Volume...
e. Accept the default values in the first few screens of the New Volume Wizard but pick drive letter F: to assign the new volume to (just our convention as other servers have D: used for temporary storage and E: used for a mounted ISO file).
f. Name the volume data. We will use this to store the Active Directory database, logs, and SYSVOL when we configure Active Directory. Finish creating the volume.
g. When the Results screen displays "You have successfully completed the New Volume Wizard" click Close.
1. In Server Manager, in the upper right corner, click Manage and select Add Roles and Features to start the Add Roles Wizard.

2. On the Before you begin page, click Next.
3. On the Select installation type page, select Role-based or feature-based installation and then click Next.
4. On the Select destination server page, click Select a server from the server pool, click the name of the AD-DC server (MBP-DC in our case) and then click Next.
5. On the Select server roles page, select Active Directory Domain Services, also select DNS Server
6. The Add Roles and Features dialog box will pop up. Click the Add Features button. Accept the defaults and click Add Features.
7. The Add Roles and Features Wizard may pop up and warn that MBP-DC has No static IP address. Click Next.
8. On the Select features page, click Next.
9. On the Active Directory Domain Services page, review the information and then click Next.
10. On the DNS Server page, click Next.
11. On the Confirm installation selections page, select the option to Restart the destination server automatically if required, then click Install.
12. When the Installation Progress page is complete, click Close.
13. In the Sever Manager, click the yellow warning triangle to display, “Post-deployment Configuration”
14. Click Promote this server to a domain controller to start the Active Directory Domain Services Configuration Wizard.
The Active Directory Domain Services Configuration Wizard will display the Deployment Configuration page (first page of the wizard).
15. Select Add a new forest and then type the name of the root domain from the Plan. In this example, mbp.com. Then click Next.
The Active Directory Domain Services Configuration Wizard will display the Domain Controller Options page.
16. On the Domain Controller options page of the wizard, accept the defaults and type in a suitably strong DSRM password. Then click Next.
17. The Active Directory Domain Services Configuration Wizard will display the DNS Options page and a warning that, “A delegation for this DNS server cannot be created…”. This warning is OK because MBP.COM is an isolated domain. Click Next.
18. The Active Directory Domain Services Configuration Wizard will display the Additional Options page. Click Next.
19. The wizard displays the Paths page. This is where we use the F: (data) drive we added to this machine in step b. Click the ellipsis (…) after each path and create folders F:\NTDS for Database and Log files and F:\SYSVOL for the SYSVOL folder.
20. click Next
21. The Active Directory Domain Services Configuration Wizard will display the Review Options page. Click Next.
22. The wizard performs the Prerequisites Check. When the Prerequisites Check page displays “All prerequisite checks passed successfully”, click Install.
The wizard will display several different Progress messages while configuring DNS services. Then Windows will log you out to reboot the server.
23. From the Azure Management Portal look for the new MBP-DC machine to return to "Running" status. Click Connect to login with Remote Desktop Connection.
24. When your browser prompts, click Open to launch RDP.
25. In the Windows Security dialog you must click Use another account because your mbpadmin account is now from domain mbp and not from the machine mbp-dc
26. Enter the credentials of the MBP\mbpadmin account because now it is in the MBP domain unlike when you created the VM. Click OK to login.
If RDP displays a certificate warning, click Yes.
Windows displays the MBP-DC desktop now with the AD DS and DNS Roles running.
27. Validate the installation by starting the Command Prompt as Administrator. Then type the following command and press ENTER:
Dcdiag /c /v
28. Verify that the tests ran successfully. Some tests related to validating IP addresses may not pass because the time service is not configured.
Your MBP-DC VM is now a Domain Controller and should have Internal IP: 10.0.0.4.
Test that this address “sticks” by opening the Azure Management Portal, selecting the new MBP-DC machine, and clicking Shut Down from the control panel at the top. Note that Azure warns that, “The virtual IP address… will be released.” Click Yes. After shutdown is complete, re-start the VM. When the VM is running again, check the Private IP address (AKA Internal IP address). It should still be 10.0.0.4.
1. From the Microsoft Azure Portal (portal.azure.com), select the Virtual Network you created in step B – 1 (mbp-net).
Azure displays the “mbp-net Virtual Network” blade.
2. Click All settings. Azure displays the “Settings” blade.
3. From the “Settings” blade, click DNS servers. Azure
4. Azure displays the “DNS servers” blade.
5. In the field that prompts, “Add DNS server”, enter the Internal IP Address of MBP-DC, -- 10.0.0.4 -- as the first DNS server.
6. Click the Save button at the top of the “DNS servers” blade
7. If the portal prompts you with a confirmation prompt “Changing the configuration of a network that is in use will briefly disrupt the connection between the virtual network and the local network. Are you sure you want to continue?” Click Yes.
8. Restart the DNS server VM from the Azure Management Portal by selecting the VM (MBP-DC) and clicking Restart.
After MBP-DC has restarted, you may remote desktop to MBP-DC and use ipconfig /all to verify the “DNS Servers” setting now specifies the MBP-DC machine (10.0.0.4). Note that I sometimes experience some delay before this setting is correctly reported by ipconfig.
Now that we have an Active Directory for our MBP domain, we can create all the service accounts we planned back in step II – E Plan Service Accounts.
Note: the steps described in this section are independent of our choice to use Azure Virtual Machines for our infrastructure. These are Active Directory steps the domain administrator must take to prepare to install a SharePoint Server farm irrespective of whether the servers are physical, virtual, or hosted in the cloud.
1. Use the .RDP file you saved on your desktop to launch Remote Desktop to the AD-DC server, MBP-DC in our case.
2. Login as the MBP domain admin (mbp\mbpadmin)
3. From the Server Manager, pull down the Tools menu from the upper right and select Active Directory Users and Computers
4. From Active Directory Users and Computers, in the left side navigation, expand the mbp.com domain and select Managed Service Account.
5. From the ribbon or context menu, create a new user.
6. From the New Object – User dialog, enter name of the SharePoint Farm account from the plan we created in Section II – E -- e.g. sp_farm – into the Full name field and also the User logon name field.
7. Click Next.
8. Enter the password from the plan
9. Un-check “User must change password at nextlogon”
10. Check “Password never expires”
11. Click Next.
12. Click Finish.
13. Repeat 5 – 12 for every service account in the plan (sp_admin, sql_service, etc.)
14. Close Active Directory Users and Computers
This section describes how to set up the DNS records for the host headers we will create in SharePoint.
The Logical Architecture we created in section II – C identifies three web applications (IIS Sites) our farm uses:
• home.mbp.com
• mysite.mbp.com
• bi.mbp.com
We will configure Host Headers in SharePoint so that we can use these URLs for our SharePoint. If we don’t use host headers, our URLs will be the name of our server plus a port number.
The Physical Architecture we created in Section II – D tells us that all three of the above IIS web sites are hosted on the MBP-WFE (Web Front End) server, which has IP address 10.0.0.7. We require three host records in DNS that map the above names to that IP. We will change this configuration later when we introduce a load balancer and a second WFE server.
If you do not yet have the IP address for your WFE server you may skip this step now and come back and complete this after you have provisioned the WFE server (but before you create any of the Web Applications home, mysite or bi).
If you are building your farm in an enterprise with a network team and a data center, you will have to ask your domain administrator to add new host records (AKA “A” records) to your domain for each Host Header Name listed above.
Each DNS host “A” records must map the host header names to the IP addresses of the SharePoint Web Front End (WFE) server.
For farms with only 1 Web Front End, the host records must map the host header names (e.g. home.mbp.com, mysite.mbp.com and bi.mbp.com) to the TCP/IP address of your WFE server.
For farms with 2 or more Web Front Ends and a load balancer (e.g. F5 BIG-IP), the host records must map the host header names to the IP address of the load balancer. If your farm has a load balancer, your network admin will have to configure it.
If you do have access to configure Active Directory Domain Services, follow these steps:
1. Log in to the Active Directory server (MBP-DC) using the domain Administrator account (mbpadmin)
2. From the Server Manager (in Windows Server 2012), click Tools (in the top right corner) and select DNS.
3. From DNS Manager, expand the server (e.g. MBP-DC), and expand the folder labeled Forward Lookup Zones. You should see your “zone” (e.g. mbp.com) displayed as a folder.
4. Right-mouse-click on your zone (e.g. mbp.com) and select New Host (A or AAAA)
5. In the New Host dialog, enter just the first part of the host name of your home web application e.g. home so that the Fully qualified domain name (FQDN) field displays the full home.mbp.com:
6. In the IP address field, enter the IP address of the Windows server that will be the SharePoint Web Front End (WFE 1) server hosting your site (assuming you have only one WFE) or the IP Address of the Load Balancer if you have multiple WFEs. In this case, 10.0.0.7.
7. Click Add Host. DNS will display “The host record home.mbp.com was successfully created.”
8. Click OK.
9. Repeat steps 5 - 7 for the hostname (e.g. mysite) of your My Site web application. Enter the same IP address.
10. Repeat steps 5 - 7 for the hostname (e.g. bi) of your Business Intelligence center web application, again using the same IP address.
11. Click Done
12. Close the DNS Manager.
You may test that these aliases work by opening any CMD prompt and typing “ping home.mbp.com”. Ping should reply “Pinging home.mbp.com [10.0.0.7]”. Then, ping will fail with “Destination host unreachable” as we have not provisioned the WFE server yet. (Even after you have provisioned the WFE server, you may have to turn off the domain network firewall on the WFE in order for Ping to succeed and show a response from your WFE server.) The important thing is that Ping is resolving to IPv4 address 10.0.0.7.
13. Sign out of the AD server.
a. Create a Resource Group in Azure
1. Open the Microsoft Azure Portal (portal.azure.com)
2. From the left side panel, click the + New button
Azure displays the “New” blade

3. From the “New” blade, scroll down, click Management.
Azure displays the “Management” blade
4. From the “Management” blade, click the Resource group

Azure displays the “Resource group” blade

5. From the “Resource group” blade, enter the name you want for your Resource Group. We’ll use MBPI.
6. Click the Create button at the bottom of the “Resource group” blade.
Azure displays the “MBPI” Resource group blade.
7. Navigate back to the Microsoft Azure portal dashboard.
b. Create a Virtual Network in Azure
This section describes how to create a Virtual Network in Azure for the MBP SharePoint farm. This will also create a subnet.All Azure Virtual Machines are attached to some Virtual network. If we just create a Virtual Machine, Azure would create a default Virtual network with a default name and attach the Virtual Machine to that Virtual network. To give our Azure Virtual network a meaningful name like, “mbp-net” we explicitly create it now. We also take this opportunity to give the subnet a meaningful name, in this case “Subnet-MBP.” Once we have our Virtual network, each time we create a new VM, we may attached it to this network.
For MBP, we will not extend connectivity to any on-premises corporate network but this would be fully supported.
1. If necessary, log in to the Microsoft Azure Portal (portal.azure.com)
2. In the upper left, click the + New button. Azure displays the “New” blade.
3. In the “New” blade, click Networking. Azure displays the “Networking” blade.

4. In the “Networking” blade, click Virtual Network. Azure displays the “Virtual network” blade.
5. In the “Virtual network” blade, the drop-down box under "Select a deployment model" should show "Resource Manager" already selected by default.
6. Click Create. Azure displays the “Create virtual network” blade.
7. In the “Create Virtual network” blade:
a. In the “Name” field, enter the name we planned: mbp-net
b. In the “Address space” field, enter 10.0.0.0/8
10.0.0.0/8 is the CDIR block that specifies the address space that gives your virtual network a usable IP address range from 10.0.0.4 - 10.255.255.255.
The requirement is for all the IP addresses you will assign to your VMs to fall within this address space.
1. If Azure warns this address space overlaps with another virtual network, specify an address range that does not overlap. If this forces you to change your plans for the IP addresses of your VMs, be sure to update your physical architecture diagram
2. Some screen shots in this guide may show Address space CIDR “10.1.0.0/16” because it avoids overlap with anther virtual network.
c. In the “Subnet name” field, enter a meaningful name. This guide uses Subnet-MBP.
d. In the “Subnet address range” field, enter 10.0.0.0/24
1. The Subnet address range must specify a range that falls within the Address space specified in the “Address space” field. The Subnet CIDR block “10.0.0.0/24” gives your subnet a usable IP address range from 10.0.0.4 – 10.0.0.254.
2. Screen shots in this guide show Subnet address range “10.1.0.0/24” because it falls within the address space “10.1.0.0/16”.
e. The “Subscription” field, by default, specifies your Azure subscription. No need to change this unless you own more than one Azure subscription.
f. Fill in the “Resource Group” field by clicking Select existing and selecting the resource group you created in step III.B.1.a. In this case MBPI.

Azure displays a “Creating Virtual Network” graphic on the portal home page while the Virtual Network is provisioned. Then it displays the “MBPI Virtual Network” blade.
2. Install and Configure Azure PowerShell on your Workstation
This optional step was omitted from this blog for brevity.3. Create the AD-DC Virtual Machine MBP-DC
This section describes how to create the Active Directory/Domain Controller (AD/DC) as the first Virtual Machine in the Virtual network. In this procedure, we provision the Domain Controller first so later, when we add additional Virtual Machines, we can add each VM to our domain.In this procedure we take extra steps to assign static IP addresses to serves so they can be shut down, and re-started in different order and always come back up with the same IP addresses.
Disclaimer: Microsoft Azure has evolved rapidly. As result, the steps in this guide have been revised. These steps were correct at the time of this revision (February 2016), but your experience and the details you see on each screen many vary.
a. Create a New VM Named MBP-DC
1. Open the Microsoft Azure Portal at https://portal.azure.com2. Sign in as needed
3. From the Microsoft Azure Portal, in the upper left corner, click the + NEW button.
4. From the “New” blade, select Compute-->Windows Server 2012 R2 Datacenter

Azure displays the "Winodws Server 2012 R2 Datacenter" blade.
a. In the "Select a deployment model" drop-down at the bottom of the blade, keep the default choice "Resource Manager" selected.
5. Click Create
Azure displays the "Create virtual machine" blade and the "Basics" blade.
6. From the “Basics” blade, in the "Name" field, enter the host name from the plan: MBP-DC. In the User Name field, enter the domain administrator User Name from the plan: mbpadmin. In the password field, enter the password from the plan. In the "Resource Group" field, click Select existing and select the resource group we created in section III-B-1-a.
|
Field
|
Value
|
Description
|
|
Host
Name
|
MBP-DC
|
From
Plan
|
|
User
Name
|
Mbpadmin
|
Local
machine admin account
|
|
Password
|
$hareP0int
|
Enter
a password of your choice
|
|
Resource
Group
|
MBPI
|
From
Plan
|

7. Click OK
Azure closes the "Basics" blad.
Azure displays the "Create virtual machine" blade and the "Choose a size" blade.

Azure closes the “Choose a size” blade.
Azure displays the “Settings” blade.
9. From the “Settings” blade, select
Disk type = Standard
Storage account = accept the default
Virtual network = select the network you configured in step III-B-1-b: mbp-net
Subnet = select the subnet configured in step III-B-1-b: Subnet-MBP
Public IP address = accept the default
Network security group = accept the default
Monitoring = accept the default
Diagnostics storage account = accept the default
Availability set = accept the default: None
Azure displays the “Change availability set” blade

10. Click OK
Azure closes the “Settings” blade.
Azure displays the “Summary” blade
11. Click OK
Azure displays the portal home page with the “Creating Windows Server 2012 R2 Datacenter” graphic while it provisions the new machine.
12. When the Azure Management Portal displays the new VM in status "Running" you may proceed to the next step
b. Configure Static IP Address
1. From the Azure dashboard, select the new VM

Azure displays the "MBP-DC" Virtual machine blade and the "Settings" blade.
2. From the “Settings” blade, under GENERAL, select Network interfaces >
Azure displays the “Network interfaces” blade
3. From the “Network interfaces” blade, select the network interface e.g. mbp-ad994.
Azure displays the “mbp-ad994 Network interface” blade and the “Settings” blade

Azure displays the “IP addresses” blade
5. From the “IP addresses” blade, under “Private IP address settings”, select “Assignment = Static”

6. Make sure the IP address field contains the IP address we planned for the AD/DC server (10.0.0.4 in this case.)
7. At the top of the “IP addresses” blade, click Save
Azure displays “Updating” at the top of the Network interface blade
c. Attach additional disks to the AD-DC Virtual Machine
1. Navigate back to the MBP-DC --> Settings blade.2. From the “Settings” blade, under GENERAL, click Disks.
Azure displays the "Disks" blade.
3. From the top of the "Disks" blade, click Attach new
4. From the “Attach a new disk” blade, select the size (GB). For MBP, we entered 100 GB.
5. Be sure to leave the Host Caching parameter to None

6. Click OK
7. Wait until the "Disks" blade displays the new Data disk ok.
8. When the Azure Management Portal displays the MBP-DC Virtual machine with Status = Running, connect to the new VM as follows. From the “MBP-DC Virtual machine” blade, on the top of the blade, click Connect.
9. Your browser prompts you to open or save the RDP file with a name like MBP-DC.rdp. Save it to your desktop.
10. Launch the Remote Desktop (RDP). RDP prompts you with a confirmation that the publisher can't be identified.
11. Click Connect
Windows prompts you for credentials. Use the account MBP-DC\mbpadmin that you just specified when creating the VM.
If Remote Desktop displays a warning that the identity of the remote computer could not be verified, click Yes.
Remote Desktop connects to the Virtual Machine. Server Manager opens.
12. Initialize the disk you attached to the VM and create a new volume to store the Active Directory database, logs, and SYSVOL
a. From the Server Manage, click File and Storage Services --> Disks
b. On the DISKS list, right-click on the new disk Number 2 (will show Partition = Unknown) and click Initialize
c. When prompted to Initialize Disk, click Yes to confirm the operation.
d. After initialization is complete, right-click the disk, click New Volume...
e. Accept the default values in the first few screens of the New Volume Wizard but pick drive letter F: to assign the new volume to (just our convention as other servers have D: used for temporary storage and E: used for a mounted ISO file).
f. Name the volume data. We will use this to store the Active Directory database, logs, and SYSVOL when we configure Active Directory. Finish creating the volume.
g. When the Results screen displays "You have successfully completed the New Volume Wizard" click Close.
c. Configure the AD-DC Virtual Machine MBP-DC
Now that your VM has been created and the extra disk attached, you may connect to it and create domain mbp.com.1. In Server Manager, in the upper right corner, click Manage and select Add Roles and Features to start the Add Roles Wizard.

2. On the Before you begin page, click Next.
3. On the Select installation type page, select Role-based or feature-based installation and then click Next.
4. On the Select destination server page, click Select a server from the server pool, click the name of the AD-DC server (MBP-DC in our case) and then click Next.
5. On the Select server roles page, select Active Directory Domain Services, also select DNS Server
6. The Add Roles and Features dialog box will pop up. Click the Add Features button. Accept the defaults and click Add Features.
7. The Add Roles and Features Wizard may pop up and warn that MBP-DC has No static IP address. Click Next.
8. On the Select features page, click Next.
9. On the Active Directory Domain Services page, review the information and then click Next.
10. On the DNS Server page, click Next.
11. On the Confirm installation selections page, select the option to Restart the destination server automatically if required, then click Install.
12. When the Installation Progress page is complete, click Close.
13. In the Sever Manager, click the yellow warning triangle to display, “Post-deployment Configuration”
14. Click Promote this server to a domain controller to start the Active Directory Domain Services Configuration Wizard.
The Active Directory Domain Services Configuration Wizard will display the Deployment Configuration page (first page of the wizard).
15. Select Add a new forest and then type the name of the root domain from the Plan. In this example, mbp.com. Then click Next.
The Active Directory Domain Services Configuration Wizard will display the Domain Controller Options page.
16. On the Domain Controller options page of the wizard, accept the defaults and type in a suitably strong DSRM password. Then click Next.
17. The Active Directory Domain Services Configuration Wizard will display the DNS Options page and a warning that, “A delegation for this DNS server cannot be created…”. This warning is OK because MBP.COM is an isolated domain. Click Next.
18. The Active Directory Domain Services Configuration Wizard will display the Additional Options page. Click Next.
19. The wizard displays the Paths page. This is where we use the F: (data) drive we added to this machine in step b. Click the ellipsis (…) after each path and create folders F:\NTDS for Database and Log files and F:\SYSVOL for the SYSVOL folder.
20. click Next
21. The Active Directory Domain Services Configuration Wizard will display the Review Options page. Click Next.
22. The wizard performs the Prerequisites Check. When the Prerequisites Check page displays “All prerequisite checks passed successfully”, click Install.
The wizard will display several different Progress messages while configuring DNS services. Then Windows will log you out to reboot the server.
23. From the Azure Management Portal look for the new MBP-DC machine to return to "Running" status. Click Connect to login with Remote Desktop Connection.
24. When your browser prompts, click Open to launch RDP.
25. In the Windows Security dialog you must click Use another account because your mbpadmin account is now from domain mbp and not from the machine mbp-dc
26. Enter the credentials of the MBP\mbpadmin account because now it is in the MBP domain unlike when you created the VM. Click OK to login.
If RDP displays a certificate warning, click Yes.
Windows displays the MBP-DC desktop now with the AD DS and DNS Roles running.
27. Validate the installation by starting the Command Prompt as Administrator. Then type the following command and press ENTER:
Dcdiag /c /v
28. Verify that the tests ran successfully. Some tests related to validating IP addresses may not pass because the time service is not configured.
Your MBP-DC VM is now a Domain Controller and should have Internal IP: 10.0.0.4.
Test that this address “sticks” by opening the Azure Management Portal, selecting the new MBP-DC machine, and clicking Shut Down from the control panel at the top. Note that Azure warns that, “The virtual IP address… will be released.” Click Yes. After shutdown is complete, re-start the VM. When the VM is running again, check the Private IP address (AKA Internal IP address). It should still be 10.0.0.4.
4. Configure the Virtual Network to use MBP-DC as the DNS Server
1. From the Microsoft Azure Portal (portal.azure.com), select the Virtual Network you created in step B – 1 (mbp-net).
Azure displays the “mbp-net Virtual Network” blade.
2. Click All settings. Azure displays the “Settings” blade.
3. From the “Settings” blade, click DNS servers. Azure
4. Azure displays the “DNS servers” blade.
5. In the field that prompts, “Add DNS server”, enter the Internal IP Address of MBP-DC, -- 10.0.0.4 -- as the first DNS server.
6. Click the Save button at the top of the “DNS servers” blade
7. If the portal prompts you with a confirmation prompt “Changing the configuration of a network that is in use will briefly disrupt the connection between the virtual network and the local network. Are you sure you want to continue?” Click Yes.
8. Restart the DNS server VM from the Azure Management Portal by selecting the VM (MBP-DC) and clicking Restart.
After MBP-DC has restarted, you may remote desktop to MBP-DC and use ipconfig /all to verify the “DNS Servers” setting now specifies the MBP-DC machine (10.0.0.4). Note that I sometimes experience some delay before this setting is correctly reported by ipconfig.
C. Configure Service Accounts
Now that we have an Active Directory for our MBP domain, we can create all the service accounts we planned back in step II – E Plan Service Accounts.
Note: the steps described in this section are independent of our choice to use Azure Virtual Machines for our infrastructure. These are Active Directory steps the domain administrator must take to prepare to install a SharePoint Server farm irrespective of whether the servers are physical, virtual, or hosted in the cloud.
1. Use the .RDP file you saved on your desktop to launch Remote Desktop to the AD-DC server, MBP-DC in our case.
2. Login as the MBP domain admin (mbp\mbpadmin)
3. From the Server Manager, pull down the Tools menu from the upper right and select Active Directory Users and Computers
4. From Active Directory Users and Computers, in the left side navigation, expand the mbp.com domain and select Managed Service Account.
5. From the ribbon or context menu, create a new user.
6. From the New Object – User dialog, enter name of the SharePoint Farm account from the plan we created in Section II – E -- e.g. sp_farm – into the Full name field and also the User logon name field.
7. Click Next.
8. Enter the password from the plan
9. Un-check “User must change password at nextlogon”
10. Check “Password never expires”
11. Click Next.
12. Click Finish.
13. Repeat 5 – 12 for every service account in the plan (sp_admin, sql_service, etc.)
sp_farm
|
sp_admin
|
sql_service
|
sql_admin
|
sp_webapp
|
sp_svcapp
|
sp_crawl
|
sp_search
|
sp_adsync
|
sp_ppvtsvcapp
|
ssas_pvtsvc
|
ssis_service
|
sp_unattended
|
14. Close Active Directory Users and Computers
D. Create New Host (A) Records in DNS for each Host Header (Web Application)
This section describes how to set up the DNS records for the host headers we will create in SharePoint.
The Logical Architecture we created in section II – C identifies three web applications (IIS Sites) our farm uses:
• home.mbp.com
• mysite.mbp.com
• bi.mbp.com
We will configure Host Headers in SharePoint so that we can use these URLs for our SharePoint. If we don’t use host headers, our URLs will be the name of our server plus a port number.
The Physical Architecture we created in Section II – D tells us that all three of the above IIS web sites are hosted on the MBP-WFE (Web Front End) server, which has IP address 10.0.0.7. We require three host records in DNS that map the above names to that IP. We will change this configuration later when we introduce a load balancer and a second WFE server.
If you do not yet have the IP address for your WFE server you may skip this step now and come back and complete this after you have provisioned the WFE server (but before you create any of the Web Applications home, mysite or bi).
If you are building your farm in an enterprise with a network team and a data center, you will have to ask your domain administrator to add new host records (AKA “A” records) to your domain for each Host Header Name listed above.
Each DNS host “A” records must map the host header names to the IP addresses of the SharePoint Web Front End (WFE) server.
For farms with only 1 Web Front End, the host records must map the host header names (e.g. home.mbp.com, mysite.mbp.com and bi.mbp.com) to the TCP/IP address of your WFE server.
For farms with 2 or more Web Front Ends and a load balancer (e.g. F5 BIG-IP), the host records must map the host header names to the IP address of the load balancer. If your farm has a load balancer, your network admin will have to configure it.
If you do have access to configure Active Directory Domain Services, follow these steps:
1. Log in to the Active Directory server (MBP-DC) using the domain Administrator account (mbpadmin)
2. From the Server Manager (in Windows Server 2012), click Tools (in the top right corner) and select DNS.
3. From DNS Manager, expand the server (e.g. MBP-DC), and expand the folder labeled Forward Lookup Zones. You should see your “zone” (e.g. mbp.com) displayed as a folder.
4. Right-mouse-click on your zone (e.g. mbp.com) and select New Host (A or AAAA)
5. In the New Host dialog, enter just the first part of the host name of your home web application e.g. home so that the Fully qualified domain name (FQDN) field displays the full home.mbp.com:
6. In the IP address field, enter the IP address of the Windows server that will be the SharePoint Web Front End (WFE 1) server hosting your site (assuming you have only one WFE) or the IP Address of the Load Balancer if you have multiple WFEs. In this case, 10.0.0.7.
7. Click Add Host. DNS will display “The host record home.mbp.com was successfully created.”
8. Click OK.
9. Repeat steps 5 - 7 for the hostname (e.g. mysite) of your My Site web application. Enter the same IP address.
10. Repeat steps 5 - 7 for the hostname (e.g. bi) of your Business Intelligence center web application, again using the same IP address.
11. Click Done
12. Close the DNS Manager.
You may test that these aliases work by opening any CMD prompt and typing “ping home.mbp.com”. Ping should reply “Pinging home.mbp.com [10.0.0.7]”. Then, ping will fail with “Destination host unreachable” as we have not provisioned the WFE server yet. (Even after you have provisioned the WFE server, you may have to turn off the domain network firewall on the WFE in order for Ping to succeed and show a response from your WFE server.) The important thing is that Ping is resolving to IPv4 address 10.0.0.7.
13. Sign out of the AD server.
Next Steps
This concludes Section III. Section III described how to create a Virtual Network in Azure and a Domain Controller to manage the Service Accounts. The next section, section IV, describes how to build a SQL Server 2012 Virtual Machine in this Windows Azure Virtual Network.
After reading this blog i very strong in this topics and this blog really helpful to all.
ReplyDeleteAzure Online Course Hyderabad
uc satın al
ReplyDeleteminecraft premium
özel ambulans
yurtdışı kargo
en son çıkan perde modelleri
nft nasıl alınır
lisans satın al
en son çıkan perde modelleri