This is section X of the MBP SharePoint 2013 BI Farm Setup Guide.
This section describes how to create the MBP SharePoint farm by running the CreateFarm script.
This section describes how to create the MBP SharePoint farm by running the CreateFarm script.
Below are links to all the sections of this Guide.
|
XIV. Configure Business Intelligence
XV. Turn Windows Firewalls Back On for All Servers
|
As mentioned in Section I, MBP stands for "Martin's Best Practices." I use MBP as the acronym for the enterprise, the domain and also the name of the farm. MBP does not correspond to any actual company or client. You may use this guide as a template by globally replacing "MBP" with the acronym or name of your company or client.
In this section we create the MBP SharePoint farm by running the PowerShell script named CreateFarm.ps1. We run this script on the first SharePoint server: the one that will become the Central Admin server (MBP-CA in this case). Subsequently, we add each of the other SharePoint servers to the farm by running AddServerToFarm.ps1.
In this section we describe how to prepare and run the PowerShell scripts provided along with this blog series. Specifically, we detail the following procedure:
A. Prepare the PowerShell scripts
1. Copy the set of PowerShell scripts to the F:\Scripts folder
2. Prepare the SetEnvironmentVariables.ps1 script for this particular farm
3. Run the SetEnvironmentVariables.ps1 script
B. Create the Farm by running the CreateFarm.ps1 script
A. Prepare PowerShell Scripts
All the PowerShell scripts used in this guide are available in the following shared, public OneDrive folder:These scrips are specifically designed for creating multiple SharePoint 2013 farms in a "pipeline" i.e. DEV - TEST - STAGE - PRODUCTION. All these scripts are free for you to copy, adapt and use.
1. Copy PowerShell Scripts to the Scripts folder on MBP-CA
1. Create a folder named Scripts on the F: (data) drive on the server that will become the Central Admin SharePoint server – MBP-CA in this case.
2. Open the MBP Farm PowerShell Scripts public folder on OneDrive
3. Download all the PowerShell Scripts from OneDrive to the F:\Scripts folder on your Central Admin SharePoint server.
4. After you have copied all the PowerShell scripts to the F:\Scripts folder, you may want to share your folder within your network. You will be editing one or more of these files and you will want to copy the updated versions of these PowerShell scripts to F:\Scripts folders on the other servers in your farm. To do this, right-click the F:\Scripts folder and select share with --> Specific people...

5. In the File Sharing dialog, click Share.

6. Click Done.
Note you have to modify the SetEnvironmentVariables.ps1 script. Do so now and later copy the scripts to the other servers.
2. Modify the SetEnvironmentVariables Script
You must modify the SetEnvironmentVariables.ps1 script for the specifics of your farm, then run the script.
The PowerShell scripts included with this guide are designed so that you can use the same PowerShell scripts for the most part unmodified on all farms because the values that differ from farm to farm are stored in Windows Environment Variables rather than hard-coded in the scripts.
However, you must still modify the SetEnvironmentVariables.ps1 script. The SetEnvironmentVariables.ps1 script sets the environment variables to the values that differ from farm to farm. The other PowerShell scripts get these values from the environment variables. This way, you do not have to modify any of the other PowerShell script.
1. If you are not logged in to the Central Admin server (MBP-CA), open a remote desktop connection to the Central Admin server and login using the SharePoint Setup Account: sp_admin.
2. Go to the Windows Start page, then click the down arrow at the bottom left to get to the Apps page
3. In the Microsoft SharePoint 2013 Products category, right-click on SharePoint 2013 Management Shell and select Pin to taskbar so that SP management shell is always handy on the task bar. You may also want to Pin to Start.

4. right-click on SharePoint 2013 Management Shell and select Run as administrator

5. At the UAC prompt, click Yes.
Windows opens the SharePoint 2013 Management Shell. Note that Management Shell displays “The local farm is not accessible. Cmdlets with FeatureDependencyId are not registered.” This is normal behavior because you have not created the farm yet.
6. From the SharePoint 2013 Management Shell, navigate to F:\Scripts
7. Enter the following command to edit the SetEnvironmentVariables.ps1 script using the Windows Interactive Script Editor
ise .\SetEnvironmentVariables.ps1

The Windows Interactive Script Editor (ISE) opens and displays the SetEvironmentVariables.ps1 PowerShell script. Take a moment to familiarize yourself with this script.
The SetEvironmentVariables.ps1 PowerShell script requires one input command-line parameter: the $environmentName parameter. This parameter must be one of the following strings: DEV, TEST, STAGE or PRODUCTION. The SetEvironmentVariables.ps1 script sets the environment variables to different values depending on what environment (farm) is specified in the $environmentName parameter. If you are only planning to build one farm, you may treat your farm as the PRODUCTION farm and use only that portion of the SetEvironmentVariables.ps1 script.
8. From the Windows ISE, scroll down to the block of code that starts
if ($environmentName –eq “PRODUCTION”)
9. Edit the values of the second parameter in each call to the SetEnvironmentVariable to the names you planned when you prepared your naming conventions in step II –F.
Refer to the table you prepared in Plan Naming Conventions step (II -F) and edit your copy of the SetEvironmentVariables.ps1 script to specify all the names and URLs you plan to use for your web applications, databases, and host headers.

10. If you are only building one farm, you only need to edit the “PRODUCTION” block of logic. Otherwise, update all environment blocks to agree with the plans you created back in step II – F.
11. Save your changes to the script.
3. Unblock all PowerShell Scripts from Execution Policy Security Block
Default windows execution policy blocks running PowerShell scripts that came from another computer.
If you attempt to run a PowerShell script without Execution Policy permitting it to run, PowerShell will display the following message:
F:\Scripts\<name of script>.ps1 cannot be loaded. The file
F:\Scripts\<name of script>.ps1 is not digitally signed. You
cannot run this script on the current system. For more information about
running scripts and setting execution policy, see about_Execution_Policies at
http://go.microsoft.com/fwlink/?LinkID=135170.
Unblock every PowerShell script in the F:\Scripts folder by opening Windows Explorer, navigating to the Scripts folder (F:\Scripts) and taking the following steps:
1. From the SharePoint 2013 Management Shell, enter the following command to unblock the UnblockFarmSetupScripts.ps1 script
Unblock-File -Path .\UnblockFarmSetupScripts.ps1
2. Now run the UnblockFarmSetupScripts.ps1 script by entering the following command
.\UnblockFarmSetupScripts.ps1
4. Run the SetEnvironmentVariables Script
You can run the SetEnvironmentVariables script from within the ISE editor by entering the script and the appropriate environment name (e.g. “PRODUCTION) in the command window:
.\SetEnvironmentVariables.ps1 PRODUCTION

NOTE: After running the SetEnvironmentVariables script, you MUST exit the ISE editor and the SharePoint 2013 Management Shell window because the newly set environment values have no effect within the current session. PowerShell will load all the new environment variable values when you start a new session.
B. Create the Farm
Perform this step on the server that will host Central Administration (MBP-CA, in this case). This will become the first SharePoint Server in the farm. This step creates the farm configuration database, the Central Admin Content Database, and the Central Admin web site. Perform this step only once per farm.Note 1: Our MBP farm architecture is slightly unusual in that it calls for Central Administration to run on the default port 80 of the Central Admin Server. The URL for Central admin will be simply http://mbp-ca.mbp.com. The CreateFarm.ps1 PowerShell script contains a line (line 86) that creates Central Administration at the default Port 80. This is fine for MBP because all the user web applications (home, mysite, and bi) are hosted on the WFE server. If your architecture calls for Central Admin to run on a different port (like, e.g. port 7777) you must modify the following line (line 86) of the script before you run it:
New-SPCentralAdministration -Port 80 -WindowsAuthProvider "NTLM"
Note 2: The CreateFarm script will prompt you to key in the Farm Account password and also the Farm Security Passphrase. For security, the PowerShell scripts do not contain any hard-coded passwords or pass phrases. Therefore, you must plan and document the account passwords and farm passphrase you will use on each environment (DEV, TEST, STAGE and PRODUCTION).
Farm Security Passphrase
|
SharePoint Rocks
|
1. If you are not logged in to the Central Admin server (MBP-CA), open MBP-CA.rdp (the remote desktop connection to the Central Admin server) and login as the SharePoint Setup Account: sp_admin.
2. From the Windows Start page, right-click on SharePoint 2013 Management Shell and select Run as administrator.
3. At the UAC prompt, click Yes
4. In the SharePoint Management Shell, navigate to the folder (F:\Scripts) where the scripts reside
5. Enter the following command:
.\CreateFarm.ps1
The CreateFarm script will output the following series of messages and prompts:
The local farm is not accessible. Cmdlets with FeatureDependencyId are not registered.
Enter password for account mbp\sp_farm (the SharePoint Farm account) : ********
Enter Farm Security Passphrase for this farm : ********
CreateFarm: Creating a new SharePoint 2013 Farm.
CreateFarm: Creating new SharePoint configuration database. This takes about 10 minutes...

The CreateFarm script will continue to work for about 10 minutes. Then it will continue and complete:
CreateFarm: Config database built, now configuring the local machine…
…
VisioWebAccess 9fec40ea-a949-407d-be09-6cba26470a0c 15 Site
WAWhatsPopularWebPart 8e947bf0-fe40-4dff-be3d-a8b88112ade6 15 Site
WAWhatsPopularWebPart 8e947bf0-fe40-4dff-be3d-a8b88112ade6 15 Site
ExcelServer e4e6a041-bc5b-45cb-beab-885a27079f74 15 Farm
ExcelServerSite 3cb475e7-4e87-45eb-a1f3-db96ad7cf313 15 Site
MobileEwaFarm 5a020a4f-c449-4a65-b07d-f2cc2d8778dd 15 Farm
MobileExcelWebAccess e995e28b-9ba8-4668-9933-cf5c146d7a9f 15 Site
ExcelServer e4e6a041-bc5b-45cb-beab-885a27079f74 15 Farm
ExcelServerSite 3cb475e7-4e87-45eb-a1f3-db96ad7cf313 15 Site
MobileEwaFarm 5a020a4f-c449-4a65-b07d-f2cc2d8778dd 15 Farm
MobileExcelWebAccess e995e28b-9ba8-4668-9933-cf5c146d7a9f 15 Site
CreateFarm: Creating Central Admin on port 80...
CreateFarm: Done.

6. You may check that this worked by logging in to the SQL server and checking that the Config database and the Central Admin Content database were created.

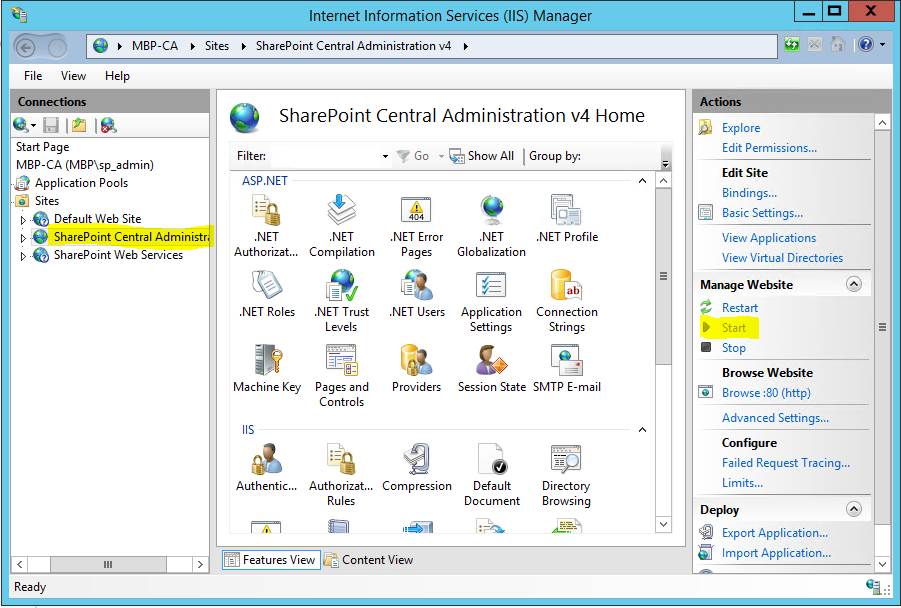
7. By default, you will have to open IIS Manager and stop the default site (at port 80) on the CA server, otherwise you will not be able to open Central Administration. If you did not change the CreateFarm script default choice of Port 80, IIS may be unable to start the SharePoint Central Administration v4 site because the IIS Default Web Site is already using Port 80. To fix this, stop the default site and start Central Admin. Do this by:
a. From Server Manager, from the Tools menu in the upper right, select Internet Information Services (IIS) Manager.
b. In IIS Manager, drill down to Sites. Select Default Web Site and click Stop in the Action pane on the right.

c. Next, select SharePoint Central Administration v4 and click Start on the Action panel on the right.
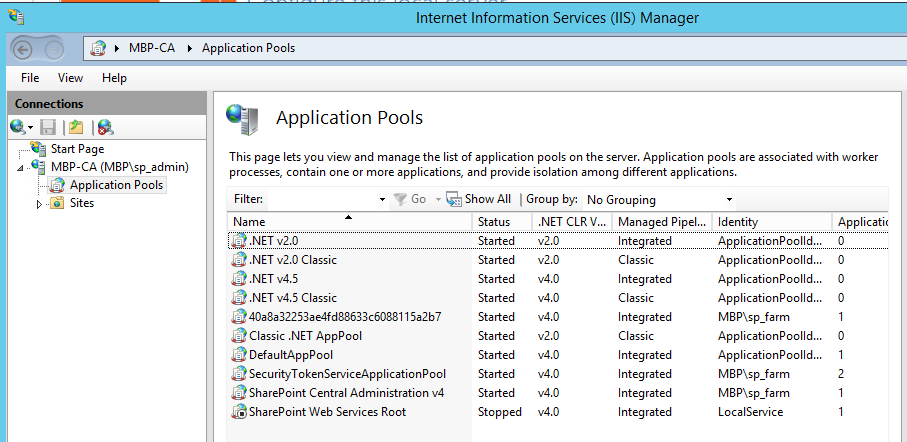
While you are in IIS Manager, if you select Application Pools from the left side navigation tree, you will note that running the CreateFarm script resulted in the creation of four App Pools:
• [GUID] using the SharePoint farm identity
• SecurityTokenServiceApplicationPool using the farm identity
• SharePoint Central Administration v4 using the farm identity
• SharePoint Web Services Root (stopped) using LocalService
d. Close IIS Manager
You should now be able to launch Central Administration by clicking Start, then selecting the Apps page (down arrow on the left of the Start Page) then --> SharePoint 2013 Central Administration. IE opens the Central Admin web site:

Your farm is now an absolute bare-minimum running SharePoint farm. Note that System Settings -->Manage servers in the farm shows only this CA server and the SQL server:

Only a very few services such as Central Administration and Distributed Cache are running on the CA server so far. Subsequent section will build up the farm one step at a time.
The next step is to create the Managed Accounts.
C. Run the CreateManagedAccounts PowerShell Script to create the managed accounts
In this step we register with SharePoint all the accounts that run different SharePoint services and Service Applications.
Back in section III C, we previously created all these managed accounts in Active Directory. In this step we just register them in SharePoint Central Administration.
The exact list of managed accounts you must register depends on your plan.
The Farm Account (sp_farm) has already been registered when the farm was created. Also, certain accounts such as the Active Directory Sync account and the SSIS Service account do not need to be registered as managed accounts in SharePoint because they are never used to run any SharePoint services or Service Applications.
For the MBP farm, the list of accounts that must be registered are as follows:
sp_webapp – the SP Web Application app pool account
sp_svcapp – the SP Service Application app pool account
sp_crawl – the Crawl Account, AKA the default content access account
sp_search – the Search Account
sp_ppvtsvcapp – the PowerPivot for SharePoint Service App pool Account
sp_unattended – the Excel services unattended Account
You must edit the CreateManagedAccounts.ps1 script if you used a different set of service accounts before you run the script. Note, however, that you do not need to modify CreateManagedAccounts.ps1 script for different farms in your farm pipeline (DEV, TEST, STAGE, PRODUCTION) as these differences were abstracted into the Environment variables by the SetEnvironmentVariables script.
Note that the CreateManagedAccounts.ps1 script does not contain any hard-coded account names or hard-coded passwords. When you run the script it will prompt you to enter each password, so have the passwords for all the above service accounts ready.
1. If you are not logged in to the Central Admin server, open a Remote Desktop connection to the Central Administration server (MBP-CA). Login as the SharePoint Setup Account: sp_admin.
2. From the Windows Start page, right-click SharePoint 2013 Management Shell and select Run as Administrator

3. At the UAC prompt, click Yes
4. In the SharePoint Management Shell, navigate to the folder (F:\Scripts) where the scripts reside
5. To edit the CreateManagedAccounts.ps1 script before running it, enter
ise .\CreateMangedAccounts.ps1
This opens the CreateManagedAccounts.ps1 script in the ISE editor. Comment out accounts you did not define for your environment. Note that we do not save any passwords in scripts or environment variables so the script includes code that prompts the user to enter passwords at run time.
6. Save any changes you made to the CreateManagedAccounts.ps1 script
7. Run the script by pressing F5 or clicking the Run Script button in the ISE Command bar.

8. The script will prompt you for the passwords for each account. Enter each password.
At the end the script displays all the managed accounts. This display shows password expiration dates but this is misleading. AD settings set to never expire will prevent password expiration.
9. When the script displays “Done” you may exit the ISE Editor
10. Exit SharePoint 2013 Management Shell
D. Add Other SharePoint Server(s) to the Farm
This section documents how to add each of the remaining SharePoint servers to the farm by copying all the PowerShell scripts to each server, running the SetEnvironmentVariables.ps1 script on each server, then running the AddServerToFarm.ps1 script on each server.
Skip this section if you are building a single-server farm.
Note that you should not need to modify any of the PowerShell scripts from the version you used on the first server (MBP-CA). You will, however, have to first unblock, then run the UnblockFarmSetupScripts.ps1 script to unblock the rest of the scripts.
1. Add the SharePoint Web Front-End Servers (MBP-WFE1 and 2) to the Farm
1. Open a Remote Desktop connection to the Web Front-End server (MBP-WFE1).2. Login as the SharePoint Setup Account: sp_admin.
3. Open File Explorer.
4. Navigate to the shared Scripts folder on the MBP-CA server.

5. Copy the Scripts folder from the MBP-CA server
6. Navigate to the F: (data) drive on the MPB-WFE1 folder and paste to create the local F:\Scripts folder.
7. Close File Explorer
8. From the Windows Start page, click the down-arrow to open the Apps page
9. From the Apps page, locate SharePoint 2013 Management Shell. Right-click SharePoint 2013 Management Shell and select Pin to Start.
10. From the Windows Start page, right-click SharePoint 2013 Management Shell and select Run as Administrator

11. At the UAC prompt, click Yes
12. In the SharePoint Management Shell, navigate to the folder (F:\Scripts) where the scripts reside
13. From the SharePoint 2013 Management Shell, enter the following command to unblock the UnblockFarmSetupScripts.ps1 script:
Unblock-File -Path .\UnblockFarmSetupScripts.ps1
14. Now run the UnblockFarmSetupScripts.ps1 script by entering the following command
.\UnblockFarmSetupScripts.ps1
15. Run the SetEnvironment Variables script
.\SetEnvironmentVariables.ps1 PRODUCTION
16. Exit this PowerShell session
17. Open a new PowerShell session as administrator.
18. Now run the AddServerToFarm script
.\AddServerToFarm.ps1

19. AddServerToFarm prompts you for the SharePoint farm passphrase. Enter the passphrase you configured in step VII - B. The script outputs the following display and ends:

20. Close the SharePoint 2013 Management Shell
2. Add Other SharePoint Servers (WFE2, SEARCH, BI) to the Farm
For each remaining SharePoint server, repeat the steps described in the previous section to add the server to the farm:
1. MBP-WFE2
2. MBP-SEARCH
3. MBP-BI
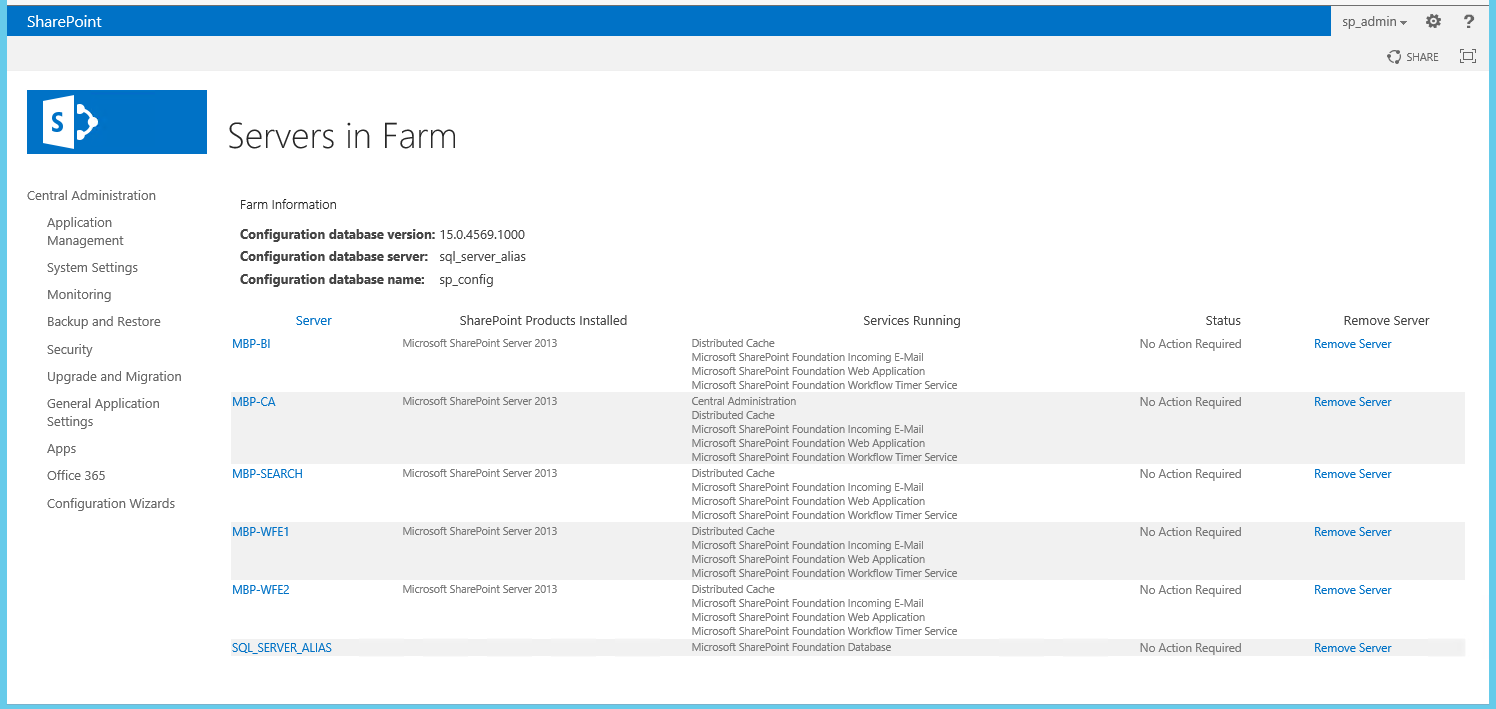
You may check that SharePoint sees all the above servers as members of the farm by opening Central Administration and selecting Manage servers in this farm.
Next Steps
This concludes section X of the MBP SharePoint 2013 BI Farm Setup Guide. In this section we described how to create the MBP SharePoint farm by running the CreateFarm script. We then registered the service accounts with SharePoint and added the other SharePoint servers to the farm.
The next section, section XI, describes how to build the base SharePoint Web Applications and Site Collections such as Home and MySites.
