Thursday, July 16, 2015

SharePoint 2013 BI Farm Setup Guide: Section X. Configure the SharePoint Farm

This is section X of the MBP SharePoint 2013 BI Farm Setup Guide. 

This section describes how to create the MBP SharePoint farm by running the CreateFarm script
.


As mentioned in Section I, MBP stands for "Martin's Best Practices."  I use MBP as the acronym for the enterprise, the domain and also the name of the farm. MBP does not correspond to any actual company or client. You may use this guide as a template by globally replacing "MBP" with the acronym or name of your company or client.

In this section we create the MBP SharePoint farm by running the PowerShell script named CreateFarm.ps1. We run this script on the first SharePoint server: the one that will become the Central Admin server (MBP-CA in this case). Subsequently, we add each of the other SharePoint servers to the farm by running AddServerToFarm.ps1.

In this section we describe how to prepare and run the PowerShell scripts provided along with this blog series. Specifically, we detail the following procedure: 

A. Prepare the PowerShell scripts 
    1. Copy the set of PowerShell scripts to the F:\Scripts folder
    2. Prepare the SetEnvironmentVariables.ps1 script for this particular farm
    3. Run the SetEnvironmentVariables.ps1 script
B. Create the Farm by running the CreateFarm.ps1 script


A. Prepare PowerShell Scripts

All the PowerShell scripts used in this guide are available in the following shared, public OneDrive folder:


These scrips are specifically designed for creating multiple SharePoint 2013 farms in a "pipeline" i.e. DEV - TEST - STAGE - PRODUCTION. All these scripts are free for you to copy, adapt and use.


1. Copy PowerShell Scripts to the Scripts folder on MBP-CA


1. Create a folder named Scripts on the F: (data) drive on the server that will become the Central Admin SharePoint server – MBP-CA in this case. 

2. Open the MBP Farm PowerShell Scripts public folder on OneDrive

3. Download all the PowerShell Scripts from OneDrive to the F:\Scripts folder on your Central Admin SharePoint server. 

4. After you have copied all the PowerShell scripts to the F:\Scripts folder, you may want to share your folder within your network. You will be editing one or more of these files and you will want to copy the updated versions of these PowerShell scripts to F:\Scripts folders on the other servers in your farm. To do this, right-click the F:\Scripts folder and select share with --> Specific people...


5. In the File Sharing dialog, click Share.


6. Click Done.

Note you have to modify the SetEnvironmentVariables.ps1 script. Do so now and later copy the scripts to the other servers.


2. Modify the SetEnvironmentVariables Script


You must modify the SetEnvironmentVariables.ps1 script for the specifics of your farm, then run the script.

The PowerShell scripts included with this guide are designed so that you can use the same PowerShell scripts for the most part unmodified on all farms because the values that differ from farm to farm are stored in Windows Environment Variables rather than hard-coded in the scripts.

However, you must still modify the SetEnvironmentVariables.ps1 script. The SetEnvironmentVariables.ps1 script sets the environment variables to the values that differ from farm to farm. The other PowerShell scripts get these values from the environment variables. This way, you do not have to modify any of the other PowerShell script.

1. If you are not logged in to the Central Admin server (MBP-CA), open a remote desktop connection to the Central Admin server and login using the SharePoint Setup Account: sp_admin.

2. Go to the Windows Start page, then click the down arrow at the bottom left to get to the Apps page 

3. In the Microsoft SharePoint 2013 Products category, right-click on SharePoint 2013 Management Shell and select Pin to taskbar so that SP management shell is always handy on the task bar. You may also want to Pin to Start.

4. right-click on SharePoint 2013 Management Shell and select Run as administrator


5. At the UAC prompt, click Yes.
Windows opens the SharePoint 2013 Management Shell.  Note that Management Shell displays “The local farm is not accessible. Cmdlets with FeatureDependencyId are not registered.” This is normal behavior because you have not created the farm yet.

6. From the SharePoint 2013 Management Shell, navigate to F:\Scripts

7. Enter the following command to edit the SetEnvironmentVariables.ps1 script using the Windows Interactive Script Editor

ise .\SetEnvironmentVariables.ps1


The Windows Interactive Script Editor (ISE) opens and displays the SetEvironmentVariables.ps1 PowerShell script. Take a moment to familiarize yourself with this script.

The SetEvironmentVariables.ps1 PowerShell script requires one input command-line parameter: the $environmentName parameter. This parameter must be one of the following strings: DEV, TEST, STAGE or PRODUCTION. The SetEvironmentVariables.ps1 script sets the environment variables to different values depending on what environment (farm) is specified in the $environmentName parameter. If you are only planning to build one farm, you may treat your farm as the PRODUCTION farm and use only that portion of the SetEvironmentVariables.ps1 script.

8. From the Windows ISE, scroll down to the  block of code that starts 

if ($environmentName –eq “PRODUCTION”)

9. Edit the values of the second parameter in each call to the SetEnvironmentVariable to the names you planned when you prepared your naming conventions in step II –F.

Refer to the table you prepared in Plan Naming Conventions step (II -F) and edit your copy of the SetEvironmentVariables.ps1 script to specify all the names and URLs you plan to use for your web applications, databases, and host headers.


10. If you are only building one farm, you only need to edit the “PRODUCTION” block of logic. Otherwise, update all environment blocks to agree with the plans you created back in step II – F.

11. Save your changes to the script.


3. Unblock all PowerShell Scripts from Execution Policy Security Block


Default windows execution policy blocks running PowerShell scripts that came from another computer. 

If you attempt to run a PowerShell script without Execution Policy permitting it to run, PowerShell will display the following message:

F:\Scripts\<name of script>.ps1 cannot be loaded. The file
F:\Scripts\<name of script>.ps1 is not digitally signed. You
cannot run this script on the current system. For more information about
running scripts and setting execution policy, see about_Execution_Policies at
http://go.microsoft.com/fwlink/?LinkID=135170.

Unblock every PowerShell script in the F:\Scripts folder by opening Windows Explorer, navigating to the Scripts folder (F:\Scripts) and taking the following steps:

1. From the SharePoint 2013 Management Shell, enter the following command to unblock the UnblockFarmSetupScripts.ps1 script  

Unblock-File -Path .\UnblockFarmSetupScripts.ps1 


2. Now run the UnblockFarmSetupScripts.ps1 script by entering the following command 

.\UnblockFarmSetupScripts.ps1 


4. Run the SetEnvironmentVariables Script


You can run the SetEnvironmentVariables script from within the ISE editor by entering the script and the appropriate environment name (e.g. “PRODUCTION) in the command window:

.\SetEnvironmentVariables.ps1   PRODUCTION


NOTE: After running the SetEnvironmentVariables script, you MUST exit the ISE editor and the SharePoint 2013 Management Shell window  because the newly set environment values have no effect within the current session. PowerShell will load all the new environment variable values when you start a new session. 


B. Create the Farm

Perform this step on the server that will host Central Administration (MBP-CA, in this case). This will become the first SharePoint Server in the farm.  This step creates the farm configuration database, the Central Admin Content Database, and the Central Admin web site. Perform this step only once per farm. 

Note 1: Our MBP farm architecture is slightly unusual in that it calls for Central Administration to run on the default port 80 of the Central Admin Server.  The URL for Central admin will be simply http://mbp-ca.mbp.com.   The CreateFarm.ps1 PowerShell script contains a line (line 86) that creates Central Administration at the default Port 80. This is fine for MBP because all the user web applications (home, mysite, and bi) are hosted on the WFE server.  If your architecture calls for Central Admin to run on a different port (like, e.g. port 7777) you must modify the following line (line 86) of the script before you run it:

New-SPCentralAdministration -Port 80 -WindowsAuthProvider "NTLM"  

Note 2: The CreateFarm script will prompt you to key in the Farm Account password and also the Farm Security Passphrase. For security, the PowerShell scripts do not contain any hard-coded passwords or pass phrases. Therefore, you must plan and document the account passwords and farm passphrase you will use on each environment (DEV, TEST, STAGE and PRODUCTION).

Farm Security Passphrase
SharePoint Rocks

1. If you are not logged in to the Central Admin server (MBP-CA), open MBP-CA.rdp (the remote desktop connection to the Central Admin server) and login as the SharePoint Setup Account: sp_admin.

2. From the Windows Start page, right-click on SharePoint 2013 Management Shell and select Run as administrator.

3. At the UAC prompt, click Yes

4. In the SharePoint Management Shell, navigate to the folder (F:\Scripts) where the scripts reside

5. Enter the following command:

.\CreateFarm.ps1

The CreateFarm script will output the following series of messages and prompts:

The local farm is not accessible. Cmdlets with FeatureDependencyId are not registered.

Enter password for account mbp\sp_farm (the SharePoint Farm account) : ********

Enter Farm Security Passphrase for this farm : ********

CreateFarm: Creating a new SharePoint 2013 Farm.


CreateFarm: Creating new SharePoint configuration database. This takes about 10 minutes...


The CreateFarm script will continue to work for about 10 minutes. Then it will continue and complete:

CreateFarm: Config database built, now configuring the local machine… 
…
VisioWebAccess                 9fec40ea-a949-407d-be09-6cba26470a0c     15                   Site                          
WAWhatsPopularWebPart          8e947bf0-fe40-4dff-be3d-a8b88112ade6     15                   Site                          
ExcelServer                    e4e6a041-bc5b-45cb-beab-885a27079f74     15                   Farm                          
ExcelServerSite                3cb475e7-4e87-45eb-a1f3-db96ad7cf313     15                   Site                          
MobileEwaFarm                  5a020a4f-c449-4a65-b07d-f2cc2d8778dd     15                   Farm                          
MobileExcelWebAccess           e995e28b-9ba8-4668-9933-cf5c146d7a9f     15                   Site                          
ExcelServer                    e4e6a041-bc5b-45cb-beab-885a27079f74     15                   Farm                          
ExcelServerSite                3cb475e7-4e87-45eb-a1f3-db96ad7cf313     15                   Site                          
MobileEwaFarm                  5a020a4f-c449-4a65-b07d-f2cc2d8778dd     15                   Farm                          
MobileExcelWebAccess           e995e28b-9ba8-4668-9933-cf5c146d7a9f     15                   Site                          

CreateFarm: Creating Central Admin on port 80...

CreateFarm: Done.

6. You may check that this worked by logging in to the SQL server and checking that the Config database and the Central Admin Content database were created.


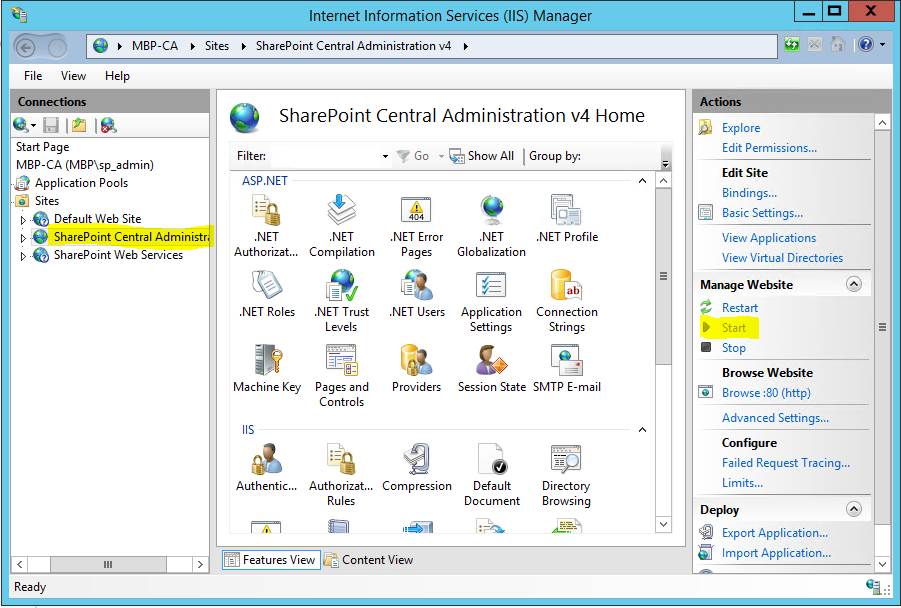
7. By default, you will have to open IIS Manager and stop the default site (at port 80) on the CA server, otherwise you will not be able to open Central Administration. If you did not change the CreateFarm script default choice of Port 80, IIS may be unable to start the SharePoint Central Administration v4 site because the IIS Default Web Site is already using Port 80.  To fix this, stop the default site and start Central Admin. Do this by: 

    a. From Server Manager, from the Tools menu in the upper right, select Internet Information Services (IIS) Manager.

    b. In IIS Manager, drill down to Sites. Select Default Web Site and click Stop in the Action pane on the right.
  

    c. Next, select SharePoint Central Administration v4 and click Start on the Action panel on the right.
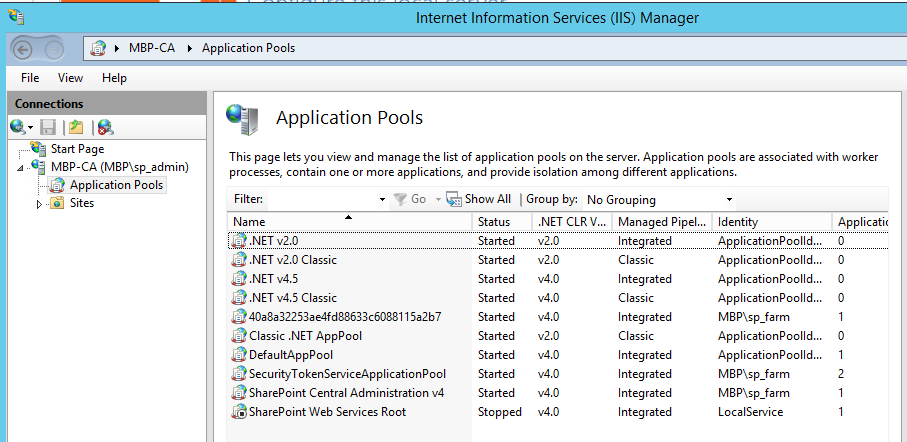
While you are in IIS Manager, if you select Application Pools from the left side navigation tree, you will note that running the CreateFarm script resulted in the creation of four App Pools:
• [GUID] using the SharePoint farm identity
• SecurityTokenServiceApplicationPool   using the farm identity
• SharePoint Central Administration v4 using the farm identity
• SharePoint Web Services Root (stopped) using LocalService
    d. Close IIS Manager

You should now be able to launch Central Administration by clicking Start, then selecting the Apps page (down arrow on the left of the Start Page) then --> SharePoint 2013 Central Administration. IE opens the Central Admin web site:

Your farm is now an absolute bare-minimum running SharePoint farm. Note that System Settings -->Manage servers in the farm shows only this CA server and the SQL server:


Only a very few services such as Central Administration and Distributed Cache are running on the CA server so far. Subsequent section will build up the farm one step at a time.

The next step is to create the Managed Accounts.


C. Run the CreateManagedAccounts PowerShell Script to create the managed accounts 


In this step we register with SharePoint all the accounts that run different SharePoint services and Service Applications.

Back in section III C, we previously created all these managed accounts in Active Directory. In this step we just register them in SharePoint Central Administration.  

The exact list of managed accounts you must register depends on your plan. 

The Farm Account (sp_farm) has already been registered when the farm was created. Also, certain accounts such as the Active Directory Sync account and the SSIS Service account do not need to be registered as managed accounts in SharePoint because they are never used to run any SharePoint services or Service Applications.

For the MBP farm, the list of accounts that must be registered are as follows:

sp_webapp – the SP Web Application app pool account
sp_svcapp – the SP Service Application app pool account
sp_crawl – the Crawl Account, AKA the default content access account
sp_search – the Search Account
sp_ppvtsvcapp – the PowerPivot for SharePoint Service App pool Account
sp_unattended – the Excel services unattended Account

You must edit the CreateManagedAccounts.ps1 script if you used a different set of service accounts before you run the script. Note, however, that you do not need to modify CreateManagedAccounts.ps1 script for different farms in your farm pipeline (DEV, TEST, STAGE, PRODUCTION) as these differences were abstracted into the Environment variables by the SetEnvironmentVariables script.

Note that the CreateManagedAccounts.ps1 script does not contain any hard-coded account names or hard-coded passwords. When you run the script it will prompt you to enter each password, so have the passwords for all the above service accounts ready. 

1. If you are not logged in to the Central Admin server, open a Remote Desktop connection to the Central Administration server (MBP-CA). Login as the SharePoint Setup Account: sp_admin.

2. From the Windows Start page, right-click SharePoint 2013 Management Shell and select Run as Administrator

3. At the UAC prompt, click Yes

4. In the SharePoint Management Shell, navigate to the folder (F:\Scripts) where the scripts reside

5. To edit the CreateManagedAccounts.ps1 script before running it, enter

 ise   .\CreateMangedAccounts.ps1  

This opens the CreateManagedAccounts.ps1 script in the ISE editor. Comment out accounts you did not define for your environment. Note that we do not save any passwords in scripts or environment variables so the script includes code that prompts the user to enter passwords at run time.

6. Save any changes you made to the CreateManagedAccounts.ps1 script

7. Run the script by pressing F5 or clicking the Run Script button in the ISE Command bar.


8. The script will prompt you for the passwords for each account. Enter each password.

At the end the script displays all the managed accounts. This display shows password expiration dates but this is misleading. AD settings set to never expire will prevent password expiration.

9. When the script displays “Done” you may exit the ISE Editor

10. Exit SharePoint 2013 Management Shell


D. Add Other SharePoint Server(s) to the Farm


This section documents how to add each of the remaining SharePoint servers to the farm by copying all the PowerShell scripts to each server, running the SetEnvironmentVariables.ps1 script on each server, then running the AddServerToFarm.ps1 script on each server.

Skip this section if you are building a single-server farm.


Note that you should not need to modify any of the PowerShell scripts from the version you used on the first server (MBP-CA). You will, however, have to first unblock, then run the UnblockFarmSetupScripts.ps1 script to unblock the rest of the scripts.

1. Add the SharePoint Web Front-End Servers (MBP-WFE1 and 2) to the Farm

1. Open a Remote Desktop connection to the Web Front-End server (MBP-WFE1).

2. Login as the SharePoint Setup Account: sp_admin.

3. Open File Explorer.

4. Navigate to the shared Scripts folder on the MBP-CA server.

5. Copy the Scripts folder from the MBP-CA server

6. Navigate to the F: (data) drive on the MPB-WFE1 folder and paste to create the local F:\Scripts folder.

7. Close File Explorer

8. From the Windows Start page, click the down-arrow to open the Apps page

9. From the Apps page, locate SharePoint 2013 Management Shell. Right-click SharePoint 2013 Management Shell and select Pin to Start.

10. From the Windows Start page, right-click SharePoint 2013 Management Shell and select Run as Administrator

11. At the UAC prompt, click Yes

12. In the SharePoint Management Shell, navigate to the folder (F:\Scripts) where the scripts reside

13. From the SharePoint 2013 Management Shell, enter the following command to unblock the UnblockFarmSetupScripts.ps1 script:  

Unblock-File -Path .\UnblockFarmSetupScripts.ps1 

14. Now run the UnblockFarmSetupScripts.ps1 script by entering the following command 

.\UnblockFarmSetupScripts.ps1 

15. Run the SetEnvironment Variables script

.\SetEnvironmentVariables.ps1 PRODUCTION

16. Exit this PowerShell session

17. Open a new PowerShell session as administrator.  

18. Now run the AddServerToFarm script

.\AddServerToFarm.ps1  


19. AddServerToFarm prompts you for the SharePoint farm passphrase. Enter the passphrase you configured in step VII - B.  The script outputs the following display and ends:


20. Close the SharePoint 2013 Management Shell 


2. Add Other SharePoint Servers (WFE2, SEARCH, BI) to the Farm


For each remaining SharePoint server, repeat the steps described in the previous section to add the server to the farm:
1. MBP-WFE2
2. MBP-SEARCH
3. MBP-BI

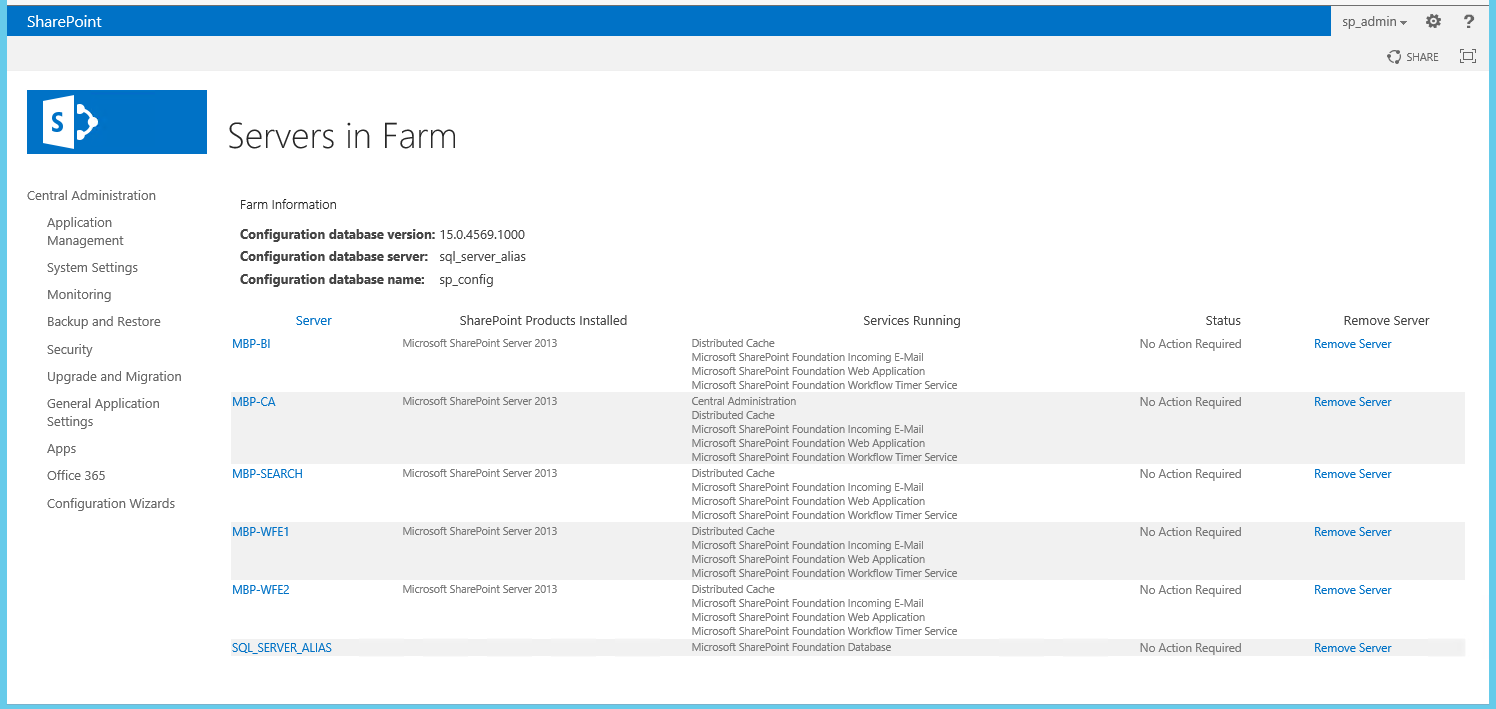
You may check that SharePoint sees all the above servers as members of the farm by opening Central Administration and selecting Manage servers in this farm.

Next Steps


This concludes section X of the MBP SharePoint 2013 BI Farm Setup Guide. In this section we described how to create the MBP SharePoint farm by running the CreateFarm script. We then registered the service accounts with SharePoint and added the other SharePoint servers to the farm.

The next section, section XI, describes how to build the base SharePoint Web Applications and Site Collections such as Home and MySites.

SharePoint 2013 BI Farm Setup Guide: Section I. Overview

This is section I of the SharePoint 2013 BI Farm Setup Guide. 


A. About this Guide

This guide specifies how to build a production-ready, multi-server SharePoint 2013 farm according to best practices. It includes detailed steps for planning, provisioning, installing and configuring SharePoint, SQL and Active Directory the way you would for a corporate intranet or extranet. Many details are included and very little is assumed; this guide does not leave you on your own to figure out how, for example, to set up your SQL server or how to configure policy objects in Group Policy Management.


1. About Section I

This section describes what this Guide is all about, what kind of SharePoint Farm you can build with this guide, and what makes this guide different than other guides available on the internet.  

2. Key Features of this Process

Key features of the process specified in this guide are:
  • On-premises equivalent using Azure Virtual Machines (IaaS)
  • Production-quality scale and security
  • Multi-server, three-tier architecture (5 SharePoint Servers; 2 SQL servers; 1 OWA server)
  • Multi-farm PowerShell scripts designed for re-use: use the same scripts to build DEV, TEST, STAGE and PRODUCTION farms
  • All PowerShell scripts included
  • All PowerShell scripts do not contain any hard-coded names, passwords or URLs

3. SharePoint and BI Features Configured

This guide includes all the steps to build a SharePoint 2013 farm with all the most common, core SharePoint features configured according to best practices, plus a set of the most important Business Intelligence features. The following is a partial list:

  • Home site collection
  • Search
  • User Profile Synchronization
  • My Sites and People Search
  • Managed Metadata Service
  • Office Web Applications
  • Secure Store Service
  • Business Intelligence Center site collection
  • SQL Server Report Server in SharePoint mode
  • Excel Services
  • PowerPivot for SharePoint

Through experience I have learned that Search and User Profile Synchronization are core features required in almost every SharePoint farm. Search and UPS are core features that can be challenging to get configured properly. Therefore it is a best practice – documented in this guide -- to get these core features working and stable before starting to configure other features such as BI, App Catalog and Workflow. 


4. PowerShell Scripts

This methodology relies heavily on PowerShell scripts, and this guide includes a library of PowerShell scripts free for you to adapt and use. These PowerShell scripts are specifically designed for creating multiple SharePoint 2013 farms. Experience has shown that use of PowerShell scripts can improve the repeatability and reliability of the process. The scripts included with this guide are tested, commented and specifically designed so that you can use the same scripts unmodified to build a set of SharePoint farms -- e.g. DEV, TEST, STAGE and PRODUCTION -- all following the same, consistent procedure. We developed this because we found that most enterprise deployments of SharePoint require a “pipeline” of SharePoint farms to support a disciplined “DevOps” process (dev --> test --> stage --> production).

The following OneDrive public folder contains read-only copies of all the PowerShell scripts free for you to download and adapt:


Section IV details the steps for you to create a scripts folder on the first server in your farm, copy the scripts into that folder, and prepare them for use in your environment. 

B. Microsoft Azure IaaS

This guide includes step-by-step instructions to build a multi-server SharePoint farm using Microsoft Azure virtual machines and virtual networks. This choice of Azure Infrastructure as a Service (IaaS) makes it very easy for anyone following this guide to build a multi-server farm without buying hardware, however, all other aspects of this guide are independent of this choice. All other parts of this guidance are valid and accurate regardless of whether you use Azure, your own physical servers, or virtual machines in a different cloud provider. 

Following this guide you can build your very own multi-server SharePoint farm without buying any server hardware and without trying to squeeze four Virtual Machines into your desktop computer using Hyper-V or VMWare.  All you need is a browser, an internet connection, and either an MSDN subscription or a credit card (or both).

Azure IaaS is very convenient because in one afternoon you can build a whole network, domain, domain controller and half dozen servers to your specifications running the latest version of windows. This approach uses the cloud as a virtual data center. This approach maps very closely to provisioning an on-premises infrastructure of servers running on physical hardware in your data center. Feel free to adapt these procedures to fit your environment if, for example, your configuration uses physical hardware in an on-premises data center. This guide is less useful for Office 365 or SharePoint Online environments.

While you may follow this guide to build a small test farm if that is your goal, the primary objective of this guild is to build a life-size, production-ready three-tier SharePoint farm. You may adapt this guide to your needs, but the example farm (MBP) configured in this guide consists of five SharePoint servers, one SQL database server for SharePoint data, one SSAS server for BI, one Office Web Apps server and one Active Directory/Domain Controller. This example farm can easily be scaled out to a larger farm, for example, by adding additional Web Front End servers, a Workflow server and/or a Cloud App server.


C. MBP Stands for Martin's Best Practices

This guide uses “MBP” as the acronym to distinguish domain names, machine names and environment variables that are specific to this guide and process. MBP in this context stands for “Martin’s Best Practice”. You may easily do a search and replace in this guide (and in the scripts) for MBP and replace it with a specific company or project name or acronym to fit your project, as needed. 


D. Acknowledgements

This guide draws heavily on the wisdom of SharePoint MVPs and Neudesic consultants. Specifically,

Many thanks also to the following Neudesic consultants:

  • Hemant Joshi - for assistance on many of the PowerShell scripts
  • Mark Grossbard - for peer review and comments
  • Marcus Crast - for the Azure tricks and Business Intelligence steps
  • Eric Stoltz - for best practices involving Group Policy Objects
  • Aaron Carpenter – for guidance on about remote PowerShell

Next Steps

This is section provided an overview of the SharePoint 2013 BI Farm Setup Guide. Next, Section II describes how to plan your SharePoint 2013 farm, including detailed tables and diagrams illustrating the MBP farm as an example.

Wednesday, July 15, 2015

SharePoint 2013 BI Farm Setup Guide: Section IX. Install SharePoint 2013 with SP1 But Quit Before Running the Configuration Wizard

This is section IX of the MBP SharePoint 2013 BI Farm Setup Guide.

This section describes how to run the SharePoint Installer and how to quit before running the Configuration Wizard.


As mentioned in Section I, in this guide, MBP stands for "Martin's Best Practices."  I use MBP as the acronym for the enterprise, the domain and also the name of the farm. MBP does not correspond to any actual company or client. You may leverage this content by replacing MBP with your client or company name or acronym.


A. Run Setup.exe

You will repeat the following steps on every SharePoint server in your farm. Running Setup.exe only installs the SharePoint 2013 bits and does not create the farm (that happens in section X).

1. If not logged in to the SharePoint server, open a remote desktop connection and login using the SharePoint Setup Account - mbp\sp_admin in this case.

2. Open windows explorer and navigate to the folder where you downloaded the SharePoint 2013 Server with SP1 ISO file – F:\installs in this case.

3. Mount the ISO file so it looks like a DVD drive to Windows.


Windows displays the contents of the DVD drive.

4. Scroll down and launch setup.exe


5. At the UAC prompt, click Yes
6. Enter your product key

7. Continue 

8. Accept the Software License Terms 

9. Click Continue


10. In the Server Type screen, accept the default Complete


11. Click Install Now


Wait about 17 minutes for setup to finish.

12. When setup finishes, do NOT Run the Configuration Wizard. In this procedure we do not run the SharePoint Products Configuration Wizard. Un-check the “Run the SharePoint Products Configuration Wizard now” box and click Close.


Repeat all the steps in this section (section IX - A) on every SharePoint server in your farm.  In the MBP farm, this includes
  1. MBP-CA
  2. MBP-WFE1
  3. MBP-WFE2
  4. MBP-SEARCH
  5. MBP-BI
Do not install SharePoint on any of the other servers e.g. the AD-DC, the SQL server, the OWA server or the SSAS server.

B. Check Technet for Cumulative Updates


Now that SharePoint is installed, you may install cumulative updates (CUs) if you wish. This is a good time to check technet for the most recent cumulative updates to SharePoint 2013 Foundation, SharePoint 2013 Server or SharePoint 2013 Project Server.

 http://technet.microsoft.com/en-us/sharepoint/jj891062.aspx

Note that you are not required to install cumulative updates to SharePoint Server unless you are experiencing an issue that is resolved in the CU. Generally as long as you are installing SharePoint 2013 with Service Pack 1 (or whatever is the latest Service Pack) you can defer the cumulative updates.

Note that if you do choose to install cumulative updates you must take care to update all servers in your farm to the same level. 


Next Steps

This concludes section IX of the MBP SharePoint 2013 BI Farm Setup Guide. In this section we described how to run the SharePoint Installer. The next section, Section X: Configure the SharePoint Farm, specifies how to set up and run the PowerShell scripts that create the SharePoint farm and the Central Administration site.

Tuesday, May 12, 2015

The Journey from On-Premises to Hybrid and Cloud

Microsoft CEO Satya Nadella, at Microsoft Ignite in Chicago last week, said, "Every company is a software company." What he meant was that every company must enhance collaboration and increase productivity at the same time, together. No easy task.

Why? Because today just about every company in the world is experiencing the fusion of collaboration (voice, chat, meetings) with productivity (business applications, workflow, and business intelligence). Each company is unique in the details of their business process and in the nature of their collaboration. Each company, therefore, needs a unique combination of software and platform, of cloud and on-premises, of custom and out-of-the-box.

Rich are the rewards to those who find a workable balance, an effective path as they maintain the known, stable on-premises systems and solutions that have worked so well for so long, on the one hand and the new, fast-changing "intelligent cloud" -- the infrastructure that powers mobility -- on the other.

At Microsoft Ignite in Chicago last week I came to fully appreciate that 80% of companies' IT infrastructure is "hybrid" and will be for at least the next 10 years.

I immediately recognized the challenges and opportunities this picture presents. The whole conference seemed to arrive at the understanding that "hybrid" is not a transition, it is not a temporary state you pass through on your way to cloud nirvana. Hybrid is the way it is now and the way it's going to be for a long, long time. So I gave myself the project -- during my five days and nights in Chicago -- of finding out what the road map looks like for companies and IT departments starting the journey into the hybrid world of cloud and on-premises together, of collaboration and productivity together.

The details of this journey from on-premises to hybrid and cloud are starting to emerge from my experiences helping customers migrate to Office 365, from breakout sessions at Ignite, and from my conversations with clients, IT professionals, and MVPs. The road map of this journey looks like this:

  • The journey actually started a several years ago with salesforce.com and accelerated when uses started using box.com and dropbox, often without the knowledge or approval of IT. 
  • The next step, very often, is Azure Active Directory, the foundation for Exchange Online and Office 365.
  • Synchronization between on-premises Active Directory and Azure Active Directory establishes your foothold in the cloud. It makes single sign-on possible.
  • Exchange online is typically the next step and the first of the previously on-premises platforms to be migrated to the cloud. The business case is strongest because risk is small and E-mail is like plumbing: a foundation with little customization
  • Midway into the cloud, many customers start using Office 365. Few though, can go 100% to SharePoint online right away because legacy investments in SharePoint on-premises solutions (full trust code) take time to rewrite.
  • OneDrive, Yammer, Power BI, and Delve start to deliver huge value to the organization. All four applications are cloud-only.
  • Around this point in the journey, MySites can be migrated to Office 365 to great benefit. Often MySites are easier to migrate than SharePoint project sites and customized sites because MySites typically have little or no customizations. 
  • Enterprise Search is a huge workload that, while very advantageous to move to the cloud, can require a lot of work to move. Infrastructure headaches with on-premises Search make this a compelling step, but there are multiple technical challenges to ensure your cloud-based search can securely crawl the on-premises content you cannot migrate to the cloud.
  • Team sites and sites with little or no branding or customization can be migrated to the cloud with benefits for the mobile and global workers. 
  • Late in the game -- deep into the hybrid/cloud journey -- come the migrations of complex, mission-critical custom applications developed using SharePoint full-trust code. These solutions require a complete re-write into the new Cloud App Model (SharePoint-hosted apps and Provider-hosted apps). While all new SharePoint custom development should be designed to conform to the Cloud App Model, legacy SharePoint solutions will have to be replaced or re-written before organizations can get rid of their last on-premises SharePoint server.

This journey through the hybrid cloud is ripe with challenges and will require constant re-evaluation. My mission, my passion, is to help my clients with the journey through the hybrid cloud, to create business solutions that address these challenges, to bring collaboration and productivity together in a world where users make their own choices -- with their own devices -- while IT professionals exert just enough governance and control to keep the enterprise secure.


Friday, April 5, 2013

Removing Content Types and Site Columns from SharePoint

This blog post provides and documents a set of PowerShell scripts we developed to remove a set of content types and their associated site columns from a production SharePoint 2010 farm.

Often SharePoint will throw the exception "Content Type is still in use" when we try to delete a content type we no longer want.

Similarly, when we try to delete a Site Column, SharePoint will throw the exception "Site columns which are included in content types or on lists cannot be deleted. Please remove all instances of this site column prior to deleting it."

I recently helped a client remove a large number of content types as well as the site columns used in those content types from a production SharePoint 2010 farm on-premises. Library templates using these content types had been used extensively, so there were quite a lot of documents, libraries, and sites that all contained references to the content types and site columns. Surgically removing all these content types while leaving in place all the sites, lists, libraries and documents took quite some doing, so I thought I would share with you here some of the knowledge and PowerShell scripts that came from this experience.
 

Background


A SharePoint Content Types is a re-usable set of Site Columns, AKA fields. Content Types are defined in the Site Content Types Gallery in each Site Collection. Content Types are used in Lists and Libraries, as well as other places like workflows. SharePoint will prevent you from deleting a Content Type that is still referenced in a list or library in that site collection. Hence the exception "Content Type is still in use."

Site Columns are also defined in a Gallery in each Site Collection. Lists and Libraries can use these Site Columns directly - without referring to the Content Type. So SharePoint also prevents you from deleting a Site Column if there are any Lists or Libraries using that site column. It throws the exception, "Site columns which are included in content types or on lists cannot be deleted. Please remove all instances of this site column prior to deleting it."

This referential integrity can make it tough to delete a set of site columns and content types without deleting the documents and libraries that use them.  To work back through this chain of dependencies, we followed the sequence of steps listed below to delete content types and site columns from each site collection.

Sequence of Steps


For each step, we provide a link to the PowerShell script (provided on a separate page) that performs that action.

We started by making a list of all the Content Types to be deleted, specifying them in a simple XML file that is one input to the PowerShell scripts.

  1. Remove Content Types from all documents in all document libraries in the Site Collection by running RemoveContentTypesFromDocs.ps1
  2. Remove Content Types from all Libraries in the site collection by running RemoveContentTypesFromLibraries.ps1
  3. Remove Content Types from the Content Type Gallery in the Site Collection by running RemoveContentTypesFromSiteCollection.ps1
If RemoveContentTypesFromSiteCollection encounters exception "Content Type is still in use" you may need to use one of the following scripts which were developed to help locate places where a given content type is still in use within the farm:
Once all the content types are removed, you may start to remove the site columns.

Again, we created a simple XML file list of site columns to be removed

  1. Remove Site Columns from all Libraries by running RemoveSiteColumnsFromLibrariesOneSubsite.ps1 (which just processes one subsite, not the whole colleciton) or RemoveSiteColumnsFromLibraries.ps1 (which process the whole site collection)
  2. Remove Site Columns from the Site Columns Gallery in the Site Collection by running RemoveSiteColumnsFromSiteCollection.ps1
If SharePoint throws exception, "Site columns which are included in content types or on lists cannot be deleted," then run one of the following scripts to search out what Content Type, List or Library may still contain a reference to that site column:

How to Operate the Scripts

All the scripts have a syntax example in the comments near the start of the script.  All the scripts that operate on a site collection take the URL of the site collection as the first input.

The scripts that work with Content Types take, as input, the full pathname of an XML file that provides a list of all the content types to be found or removed.  The file ContentTypes.xml was used for this input file.

Similarly, the scripts dealing with Site Columns take, as input, the full pathname of an XML file that lists the names of all the Site Columns to be found or removed.  This file is named SiteColumns.xml and resides in the same folder as the scripts.

I hope these scripts are helpful and save you some time.

Thursday, November 15, 2012

Yammer or SharePoint 2013 or Neudesic Pulse for Social in 2013?


At the SharePoint2012 conference in Las Vegas, Microsoft showcased Social Computing in SharePoint 2013 and Yammer, and articulated vociferously their new-found commitment and enthusiasm for social as a central feature of intranets and pretty much everything else going forward.

This love-fest around social computing was dampened by the reality that Microsoft developed a set of Social features in SharePoint 2012 and then subsequently acquired Yammer. While the acquisition of Yammer underscores Microsoft's commitment to social, it muddied the waters leaving us with a distinctly cloudy and complicated message.
 
In a nutshell, that complex message seems to be that Yammer is the premiere social computing product that customers should use if at all possible, the Microsoft-developed social features in SharePoint 2013 are an alternative that may also be useful in certain circumstances, but pick one or the other: don't use both.

My clients are asking me which way to go, and I am working hard to synthesize a decision tree. Most of my clients embrace enterprise social computing and some need the kind of deep integration of Social features into applications that Yammer's Adam Pisoni was talking about at the SharePoint Conference 2012. (By deep integration I mean solutions for scenarios like deriving insight into customer needs or product development.) I don't have that decision tree worked out yet, but it is clear that they must choose one of three directions: 1) yammer if at all possible, the key  problem being if clients require hosting all data on-premesis, because the data in Yammer exists in the cloud. 2) social in SP or 3) a third-party product like Newsgator or Neudesic Pulse, which work fine in 2010.

Friday, September 21, 2012

Why Social Computing Really Comes to Life in SharePoint - 1


This series of posts explores the synergetic relationship between social computing and collaborative computing, with an in-depth look at several high-impact applications that leverage social computing features in SharePoint 2013.

I developed these applications and the attached PowerPoint presentation for SharePoint Saturday Redmond 2012.

So why does social computing really come to life in SharePoint? In a word, because it keeps the communication in context:

 
  • Successful social computing applications in SharePoint capture the communication between users in the context of the work they are doing.
  • It helps users keep track of people, keep track of work and keep track of the connections between them.
  • Social computing, done right, elevates teamwork to a whole new level.
  • It helps users find and get help from the experts, improving the traction and efficiency of the organization. And it can improve the overall quality of the work product
Why I Care

I have been developing collaborative applications since the early 1990s, starting with Lotus Notes, later with Groove, and now with SharePoint. I have followed the rise of social computing with great interest and healthy skepticism. What I see now is ample evidence that Social Computing can greatly increase the impact of many collaborative applications. The caveat is, l
ike everything in SharePoint, you have to do it right. 

Now, you may ask, “How can you say there is ample evidence that Social Computing is so great in SharePoint, when SharePoint 2013 hasn’t even been released yet?"

The answer is that social is nothing new to SharePoint. We’ve been building social applications in SharePoint since at least 2008. Companies like Neudesic and NewsGator have shipped Social products and deployed Social Apps in SharePoint with great success for years.

At Neudesic, we have been building compelling Social Computing apps integrated into SharePoint using our Pulse product. So I was extremely interested -- to put it mildly -- when, in July 2012, Ben Wilde demonstrated the SharePoint 15 Social Investments.
What immediately struck me, watching Ben's demo, was that the Social features in SharePoint 2013 look an awful lot like the Neudeisc Pulse in SharePoint 2010.
My reaction? Now that we have SharePoint 2013 in Beta, it validates what Neudesic has been doing all along. The social computing features in SharePoint 2013 bear such an uncanny resemblance to those in Neudesic Pulse that we must be seeing some kind of convergence. 

Pulse is the Social Computing product from Neudesic. Like corporate facebook, Pulse is a stand-alone product, but it integrates well with SharePoint 2010.

Analyzing Pulse in SharePoint 2010 side-by-side with Social in SharePoint 2013, I have come to the conclusion that the similarities far outweigh the differences. The biggest differences, in my analysis, are:
  1. Pulse has been shipping for 3 releases now
  2. Pulse works great in SharePoint 2010
  3. Pulse does not require My Sites, and
  4. You can use Pulse stand-alone (without SharePoint) if you like.
Pulse also has awesome iPhone, Android and Windows Phone apps:
 
So I set out to write these blog posts; not so much to compare and contrast Pulse with SharePoint, but rather to analyze what makes social computing work best in the context of SharePoint applications. With my deep experience building collaborative software, my inside knowledge of Pulse, and my professional expertise in SharePoint, I feel uniquely qualified to convey my answers to the following key questions:
  1. What are the key features behind successful social computing in SharePoint?
  2. What are the high-impact applications where social really works? And
  3. How can I build these high-impact applications – either in SharePoint 2010 or in SharePoint 2013?

Let's start by looking at the technical elements that make the integration of social into SharePoint successful. Later I will demonstrate how, using these elements, to build compelling SharePoint applications that leverage social computing.

The Nuts and Bolts of Social Computing


These are the building blocks -- the core, Facebook-inspired features -- that are the nuts and bolts of social computing.

Micro-blogging
Micro-blogging is at the heart. You can read, post, and reply. The result is a threaded discussion; When merged with other threads we sometimes call this an activity stream.

Follow

What does it mean to Follow? To Follow an activity stream adds that stream to your newsfeed

In SharePoint 2013, you can follow:

  • People
  • Documents
  • Sites
  • Tags 
In Pulse in SP 2010 you can follow:
  • People
  • Posts
  • Groups
  • Tags
  • Systems
In Pulse, follow also creates a bookmark (“People followed by me”)

Liking and Mentioning

Both Liking and Mentioning create connections. You get a notification in your E-mail each time someone mentions you in a post.

Tagging and Rating

Tagging and Rating (or voting) are both a bit like democratic bookmarking. You use tags and votes to find stuff later.

 E-mail

Speaking of Mentioning: don’t forget E-mail! The E-mail in-box remains so deeply entrenched you cannot succeed without robust email integration. Notifications go to your inbox each time someone mentions you in a post. The E-mail contains a link back to the Activity Stream. This drives people back into the social tool which is good. As much as we all wish E-mail would become obsolete, it is not. It’s entrenched. It’s the boat anchor. Your social solution must integrate with E-mail or forget it.

So what kinds of collaborative applications really shine when enriched with social features?  And how do I create great social + collaborative applications now that we have such a rich tool chest to work with?
Four High Impact Social Computing Apps in SharePoint

Here's my short list of high-impact social computing applications in SharePoint:


Team collaboration around developing a document or presentation

A typical scenario for this application is when a sales or account team needs to collaborate around developing a response to an RFP. 

A well-designed team collaboration application focuses the social discussion on the document, doc set, or other work product that the team is developing. Your key design point for this kind of application is to present the work-product content as close to the discussion as possible.

Knowledge base -- or forum -- where community members vote on, or rate, documents, answers or posts

Knowledge management experts know the value of end-user feedback to refine, or filter a corpus of knowledge.  

The design point of a knowledge base, or forum, is to harness the knowledge of your people, leveraging that wisdom to cultivate and continuously refine the repository of content. The feedback must be leveraged to sort views and rank search results so that others can find the best, most useful stuff right away.


KPI dashboard where metrics are enhance by discussion; group leaders and members discuss and act on results


SharePoint has long been a great platform for Business Intelligence (BI) dashboards. Now social features only make that better.

Your key design goal for applications like this is to give dashboard users immediate access to the people who are responsible for the business or the process that the metrics are measuring.  Managers need to be able to ping a team member and ask why a certain KPI has turned red. If you are the one responsible for a certain outcome, you want to be able to post a comment that lets everyone (like your boss) know that you are aware of the metric, and you know what your team is doing about it.

Expertise Finder: Identifying and getting help from co-workers who have specific knowledge

I rarely see a specific application created for finding experts. Rather, finding expertiese is implemented by making sure Search includes detailed, up-to-date user profiles. 

Enterprises realize significant value from the ability to find co-workers who have specific knowledge.  While this may well be the most important app on my short list, it often comes for free as a by-product of a truly collaborative corporate culture.

The key elements of expertise finder are:
  • broad user adoption and participation in social technologies
  • detailed user profiles
  • effective search
In subsequent posts, we'll examine actual implementations of some of these applications, mostly using SharePoint 2013. We'll give screen shots and instructions for how to build these apps using out-of-the box features available in SharePoint 2013.